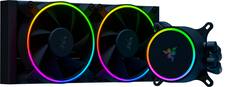
Razer - Hanbo Chroma RGB AIO 240mm CPU Liquid Cooling System - Black
Model: RC21-01770100-R3M1
SKU: 6496134
This item is no longer available in new condition. See similar items below
Customers recognize the Hanbo Chroma RGB AIO 240mm CPU Liquid Cooling System's excellent cooling performance and straightforward installation process. The RGB lighting is also frequently praised for its attractive appearance and enhancement to PC aesthetics. While some users noted the system's noise level at higher speeds, the overall positive feedback highlights its effectiveness and ease of use.
The Hanbo Chroma 240mm AIO is one of Razer’s newest AIO coolers alongside the 360mm version. I am no stranger to AIO coolers as I have had one running on my gaming PC for a few years now - Deepcool Gamerstorm 120EX and now a NZXT Kraken M22. I have been sold on AIO’s for the shear reason of lower noise per degree of cooling over the vast majority of air coolers. You really have to go high end on air coolers if you want the cooling capacity of an AIO at the same noise levels. I have an open air case, Thermaltake Core P3, which gives me flexibility for mounting (to an extent). In my tower I have an NZXT Kraken M22 (120mm AIO). The PC I built for my partner’s kids is also based out of the Core P3. Our systems are very similar – I have an R7 1800X with a 95W TDP, and they have a R5 3600XT with 95W TDP. Their system was a better fit for the Hanbo due to the location of one of my system drives – the lower portion of the radiator would be blowing right onto a SSD I have mounted. Their system was also using the stock AMD air cooler, which had zero LED’s (sad) and ramped up to full speed easily (sadder). Specs Socket Support - Intel: LGA 1200, 115X series, 1366, 2011, 2011-3, 2066 AMD: AM4 Dimensions - Radiator + Fans: 275mm x 123mm x 52mm Pump: Ø79mm ( fittings add a 20mm bump) x 55mm Tubing – 400mm Rubber Nylon Sleeves Fans – 2x 120mm 4pin PWM with addressable LED; 2250 Max RPM Lifespan – 50,000 hours Design The Hanbo has a sleek looking design that incorporates addressable LEDs into the fans and pump housing face. The LEDs have such a smooth color to them that you can’t pick out any individual diodes. The fans are 120mm PWM with addressable LEDs. Their center hub sport the razer logo. The radiator itself has excellent fit and finish all around – all the fins were in perfect shape. The fans mounted easily to the radiator and similarly the radiator mounted to my case easily. The face of the pump is magnetically attached so you can rotate the logo to the correct orientation (it has 4 orientations where the magnets line up for attachment). The pump housing is pretty stout and feels well made. It has 2 port for cabling to attach – USB-C and a molex style port. The USB-C port pairs with the included cable that plugs into one of your MOBOs available USB headers. The molex cable links up with the fan cables and also plugs into your MOBOs system fan header. The fans daisychain together before linking up to the cable coming off the pump head. The harness also needs 12V from a SATA power connector. Overall, the way the wires come out make for some good and not so good cable management. The fan cables make it easy to bundle them up and route, and so does the USB-C cable to an extent. I didn’t care for how the system fan wire split off from the pump header and main bundle – it made dressing cable difficult. There was either too much cable for the short route or too little to be able to route somewhere out of view and then loop back to the header. Installation I set to work installing the AIO by removing the old heatsink. Unfortunately, the heatsink pulled the CPU out with it – the thermalpaste really adhered the 2 together. I ran the CPU under a good load before shutting things down in order to avoid this – this is a known occurrence for AMD processors. I got out a small plastic pry tool and gently popped the CPU free. I was very thankful to not have bent any pins – always pull straight out when removing your CPU cooler. I used a cotton swab and rubbing alcohol to clean up the old thermalpaste and prep it for the new cooler. I assembled the fans on to the radiator with the included hardware without any fuss. Mounting the radiator to my case chassis was also pretty easy – I used all 8 screws to mount the radiator, but I could have just used 4 and been fine. I did a few test fits for pump head orientation. The bracket that is used to mount the pump head just twist-locks into place. The pump head is pretty large – 3.1” diameter vs. the 2.5” for my NZXT. I ran into a few issues at this stage that made me glad I did the mockup fitting. I found that the line fittings would crash into the mounting studs/nuts in certain positions. For the AMD AM4 bracket the 1, 5, 7, and 11 o’clock positions could not be used – I did not check this with the Intel brackets. Based on where I could mount the radiator – to the right of the CPU with fittings at the bottom – I only had a few mounting positions that the lines would reach (12, 2, 3, 4 and 6). I have the GPU mounted vertically on a riser cable, which made the lines push against the backplate of the GPU at the 6 o’clock position. The lines would have been resting on the GPU backplate if it was mounted directly onto the board (horizontally). This isn’t really ideal due to potential thermal transfer from the GPU to the lines, but also because GPU’s already sag enough in this position without anything resting on them. The 12 o’clock position runs afoul of VRM heatsinks both for the lines and the USB/MOBO connectors on the pump. The only locations left to mount were 2,3, and 4 o’clock. All 3 of these positions block a RAM slot. I only run dual channel, so this slot was open, but this is certainly an issue if you are fully populating your RAM. I chose the 4 o’clock position because that gave me the best line bends around my GPU and the located of the USB/MOBO connectors in the best place for cable routing. This is not something that I dealt with on my NZXT or DeepCool pumps, nor have seen come up with Corsair and Cooler Master setups I installed for some friends. Software The Hanbo uses Razer’s Synapse 3 software to control the fan curve, configure the LEDs, etc. The software is pretty easy to use and has a nice graphical layout. You can even mock up your pump and radiator locations in the software that mirrors their physical location in your case. I have mine set to do a color wave across my case – this layout allows the wave to be accurate and the colors to match the hardware locations. I also downloaded a utility from Github called Chroma Control. I have an ASUS GPU and Corsair keyboards that I wanted to match all the lighting with. Using the Chroma Control plugin in Synapse 3 I could add my GPU and keyboard to the mix and match lighting across everything. This is not native within iCUE (Corsair), Armoury Crate (ASUS), or Synapse 3. Performance I took some readings with the stock cooler that had been in place prior to putting the Hanbo on. At idle the original heatsink maintained the CPU at 37.12 °C. Noise levels at idle were 32dB @ 1 meter. Under a full load stress test (AIDA64) the CPU peaked at over 94 °C (thermal limit before throttling is at 95) and sustained at 93.5 °C. Fan speed was maxed out and reached 45.1 dB @ 1 meter. With the Hanbo cooler in place system idle is at 36 °C with the fan speed at 20%. Sound levels were at 25.5 dB @ 1 meter. I had the fan and pump curves set on the default Advanced profile. Under a full load stress test (AIDA64) the CPU peaked at over 81 °C before settling back to 77 °C once the fans and pump picked up speed. Fan speed was just shy of maxed out (2220 RPM – Max is 2250) and reached 36dB @ 1 meter. I messed with the fan curve to force the speeds to max but that didn’t cause any noticeable change in noise level. Conclusions from this are pretty straightforward. At idle the CPU temp was 3% lower with a 20.3% reduction in fan noise. At max load the temps were 17.65% lower and fan noise cut 20.2%. The key takeaway is the stock cooler barely keeps it under the thermal limit of the CPU at full load while the Hanbo kept it comfortably below the limit. Fan noise was also greatly reduced – max load volume with the Hanbo was just a bit louder than the stock cooler at idle. The fan noise at idle cannot be discerned from background noise. Keep in mind all of this is done with an open-air case with nothing separating me from the dual-fan setup. You can also reasonably assume there is plenty of cooling overhead for overclocking if you choose to go down that path. Overall the Razer Hanbo makes a compelling argument for itself in the world of AIO CPU coolers. A lot of these coolers live and die by their software support, and so far I have really liked the Synapse 3 interface (take a look at the Chroma Control Plugin if you have ASUS or Corsair RGB items). I really enjoy the look of the Hanbo and its LEDs are some of the best looking of any coolers I have seen. The radiator and fans were easy to mount and cables were long enough to make routing easy. The only real snag I hit orienting the pump head. The head is quite large and the line fittings interfere with the first RAM slot on my MOBO. If I had a traditional case with an overhead or rear radiator mount then this might not have come up.
Posted by DaveW
My primary intent for this product was to pair it with an Intel i7-12700K, which is a fairly hot-running CPU under load. My case doesn't really have the room for a 360mm AIO, so 240mm seemed ideal. On opening the box, it's clear that Razer cares about packing well. The box could have arrived crushed and the cooler inside would have likely survived. It has everything you need for a variety of mounting applications, including brackets for both Intel and AMD coolers up to the latest generation. The pump is powered by Asetek and it uses the standard Asetek mount. If you're looking to replace an old Asetek unit, this will probably just bolt right on with no fussing about the brackets. These pumps are some of the best on the market. Apart from the hardware, there's a minor rats' nest of cables that need to be attached. One is a USB-C cable that you'll need to connect to a free 9-pin USB header on your motherboard, and the other is a multi-cable plug that carries the pump power cable, a SATA cable, an RGB cable and a fan cable with connectors for up to three fans depending on which model you've got. Installation is straightforward and as easy as your case allows it to be. If you've got easy tray access or backing hardware already attached, you'll just need to screw in the right standoffs to attach the cooler. To make things a lot easier on yourself, try to run as many of the cables as you can before you permanently attach anything. It's been said before but it bears repeating, when choosing placement for the cooler, make sure the pump isn't at the top of the loop, and try to keep the tubing for the radiator angled down or sitting at the low point, this will help reduce noise and prolong the life of the pump. You can angle the pump any direction you like, but the connectors for the cables are counter-clockwise to the tubing, so if the tubing is at the bottom, you'll likely collide with your memory modules. Just keep that in mind. The pump head features a removable plate that's held on via magnets, and immediately makes you wonder if Razer has plans for either additional replacement covers with different designs, or a small LCD add-on in the future, which would be welcome, but feels unlikely, since there don't appear to be any additional electrical connections in place to power it. You may find, if you install the included standoffs and backplate, that the backplate feels "loose". Once the cooler is mounted, however, it should feel snug. The fans are nice and quiet at normal operating speeds, and they (as well as the pump head) have excellent LED lighting that create a very smooth appearance with no hotspots. I was expecting the Razer Synapse software (which automatically attempts to install when you start your machine up) to be a resource hog, but it's surprisingly light, using almost no system resources while running in the background. It's powerful enough, but doesn't feel as fully featured as some of it's competitors' software. The cooling, against my 12700K, wasn't as great as I'd hoped. The tubes were unfortunately too short for me to mount the cooler as an intake at the front of my case, so I had to mount it as exhaust. It did keep temps in the mid-70s under load, but If you plan to do any sort of overclocking to this chip, I'd advise you to pick up a 360mm model, as I hit thermal limit on even a very modest overclock. The fans are quiet until they need to kick into overdrive. Then they're audible from across the room. They do their job, though, and that's what matters. I wound up picking up a 280mm AIO with longer tubing elsewhere to use in my office gaming rig, and moved this to my living room machine (11600K), where I could top-mount it. It's keeping things a solid 20 degrees cooler under load than the air cooler I had in it before, which is impressive. It also looks great, which is a definite plus. All things considered, this is a premium product with a premium tag attached. There are cheaper Asetek coolers out there that will work just as well, with maybe a bit more noise and less style. If that style is important to you, this cooler has the performance to match it, and you should definitely consider it.
Posted by Cryos
There’s an ongoing debate about the difference between air coolers and AIO water coolers, some would say it’s settled and there’s no discernible difference. After installing the Razr Hambo Chroma, I’m not so sure I’m convinced. You can look further in the review if you want to see the TL;DR. I’ve not owned any Razr products until this one so I wasn’t really sure what to expect. I know they make premium gaming laptops and peripherals so I was looking forward to this AIO cooler. When I first opened the box I was pleasantly surprised at the quality of packaging and unboxing design. The mounting hardware, fans, and the cooler was all nestled into foam cut outs. The parts and fan were nestled and protected inside cardboard box while the AIO radiator and pump have a near perfect cut out to protect it from shipping and transportation. Also included is a quick start manual, Allen wrench, and The build quality is in line with the unboxing experience. The fans feel sturdy and the plastic doesn’t feel thin or cheap. The mounting holes for the fans have included rubber dampeners to prevent vibration noise. The fan cables have braided tubing and enough length which I think is the standard for premium fans anymore. The tubing from the pump to the radiator is also braided. The mounting hardware and brackets were well packaged and some were labeled for Intel or AMD. Mounting wasn’t too difficult. I struggled more getting my old cooler off than I did mounting the new one. If you’ve not mounted a cooler onto a CPU before, you may want to watch a few videos just to get the feel for it. It can be frustrating if you have to take the AIO off to make any adjustments and put it back on. The only thing I I’d like to see done better in AIO coolers is the mess of cables that come off the block that plug into the fan controller, fans, usb connector, RGB controller. It’d be nice if we could get to where there’s just a plug on the board that do all that is needed for these coolers. I had everything I needed to get it mounted in my kit for my AMD processor. Had I messed up the mount though, there wasn’t any additional thermal paste in the kit to take a 2nd try at mounting. Once I was able to get some cables managed and put the panels back on, I booted into windows and got a pop up for downloading the Razer software which I think was a nice touch so I didn’t have to go find it. I spent a little bit of time in the Razer Synapse tinkering with fan curve and RGB before putting it through it’s paces. Before I installed the AIO cooler, I grabbed a few benchmarks with my old cooler and then ran the same benchmarks with the Razer Hanbo. I was getting a 3DMark Time Spy score of 12,594 on a well reputable air cooler, and 15,763 on Cinebench, all while cooling an AMD 5800X. Once I got the Razer Hanbo installed, I was getting 12,633 on Time Spy score but my Cinebench was scratching at 16k with a 15,944 Cinebench score. I forgot to grab the before temperatures, but the after temperatures are pretty normal given the testing. The CPU is slightly overclocked to 4.7 GHZ and with core voltage set at 1.35 and temperatures on the CPU die held steady at 83.1*C while testing. I can tell you my The cooler is quiet when not under load which was a little different with my air cooler. I think just the flow of the liquid is enough to keep idle temperatures cool. Once it goes under load, the custom fan curve applied doesn't ramp up the fans until around 60*C with them full throttle at 80*C to keep temperatures from running away and thermal throttling. I like being able to browse the internet or work on documents without having to hear any background noise from the CPU fans. At full throttle, like most good fans, you're going to hear them and the fans surprised me a bit at how much air they were pushing through the radiator. I think the good seal they have around the radiator and the speed and blade design play a part in this. Finally the RGB and software. I wasn't as impressed with the software as I was the hardware. The software is functional but a little crowded. In the Synapse app, you can control the functions of your AIO pump. There's 3 preset control types for fan and pump and a manual mode. Quiet, Standard, and Performance adopt a fan and pump speed curve for there respective descriptions but you wouldn't know what they are because they're not displayed. Instead, you get the option to see a curve graph once you click manual and set your own. The lighting presets left a bit to be desired but I'm glad they're there because, like most RGB software, I feel like for a truly custom RGB experience I need to spend hours setting up lighting patterns and color shifts. There are 3rd party software out there that does this well too, unfortunately, the Razer Hanbo isn't compatible, so I'm left doing a static or preset RGB and making my other RGB devices work around it. TL;DR Pros: - Sleek Design and quality hardware - High performance, cool temps vs air cooling - Quiet when only pump is running - Had all necessary hardware - Premium unboxing experience Cons: - Limited RGB presets, low compatibility with RGB control software - Lots of cables coming from AIO pump, looks "busy" - Instructions may be a bit vague for beginners Final Thoughts: You don't have to be in the Razer ecosystem to appreciate this AIO cooler. It's up there in performance and quality of build with the rest of them. I felt like a lot of thought went into the design of the product and they wasn't going to put something out until they were happy with it. I do like presets with my RGB software and I wanted a bit more from the Synapse software and would have liked less cabling coming off the AIO pump but I understand certain features may require it. Hard not to recommend this cooler.
Posted by TravisJ
The vast majority of our reviews come from verified purchases. Reviews from customers may include My Best Buy members, employees, and Tech Insider Network members (as tagged). Select reviewers may receive discounted products, promotional considerations or entries into drawings for honest, helpful reviews.