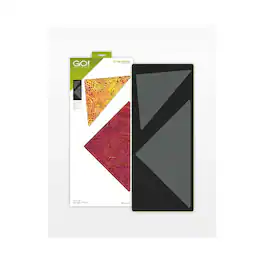
AccuQuilt - GO! Setting Triangles Die – 12" Finished On-Point Quilt Triangles Cutting Die - Multicolor
Related Item

About This Item
- General
- Brand: AccuQuilt
- Model Number: 55554
- Product Name: AccuQuilt GO! Setting Triangles Die – 12" Finished On-Point Quilt Triangles Cutting Die
- Color: Multicolor
- Features
- Product Type: Cutting material
- Material: Fabric
- Dimensions
- Product Height: 0.3 inches (The out of box height of the item. Height is measured as the vertical distance from the bottom of the item to the top as it would be primarily used or placed.)
- Product Length: 6.1 inches (The out of box length of the item. Length is measured as the longest dimension of the item.)
- Product Weight: 0.31 pounds (The out of box weight of the item.)
- Product Width: 5.9 ounces (The out of box width of the item. Width is measured as the horizontal distance from one side of the item to the other as it would be primarily used or placed.)
- Warranty
- Warranty - Parts: 1 Year Warranty, We may deny warranty coverage if the product is damaged from using an unauthorized part.
- Other
- UPC: 699195555541
Don’t let complicated math equations hold you back from creating beautiful projects and quilts with blocks set on point! This die makes it easy - cutting both corner and side setting triangles. Just add your creativity and GO! •AQ Cutting Mat Required: GO! Cutting Mat, 10 in. x 24 in. (25.4 cm x 61 cm) How to Die Cut 12" Finished Setting Triangles: For best cutting results, position fabric on the lengthwise grain (straight of grain) as it goes under the roller. Side Triangles: Cut 9-5/8" x length of fabric (LOF) strip along the selvage edge. Layer up to 6 layers of fabric. Use the Cut & Flip™ method. Start at one end of fabric by placing fabric right side up over the side triangle shapes. Place die through the cutter. Continue to cut and flip by placing fabric wrong side up and align the cut angle of fabric with the angle of blades. Continue to cut side triangles in this manner by flipping the fabric after each cut across the length of fabric. Cut 2 side triangles across the width of 40" of fabric. One yard of 40" wide fabric-cuts 8 side triangles. Corner Triangles: Cut a 9-5/8" strip across the width of fabric. Fanfold into 9-5/8" widths. Place on selected blade and cut. Cut 4 corner triangles across the width of fabric. One yard of 40" wide fabric-cuts 8 corner triangles. Why Quilters Love the GO! 12" Finished Setting Triangles Die: Expand your quilt design options and make on-point quilts with ease! The GO! Setting Triangles-12" Finished die includes the corner and side setting triangles for creating 12" finished on-point quilts. No math required! GO! Setting Triangles dies include the corner and side setting triangles that are difficult to cut by hand. No need to buy two dies! Both corner and side setting triangles included on one die. GO! Setting Triangles-12" Finished includes ¼" seam allowances and dog-eared corners for easy alignment and piecing.
- Create on-point quilts without complex math: Cut perfectly sized side and corner triangles for 12" finished blocks—no calculations or guesswork needed.
- Includes both corner and side triangles: All essential shapes are included on one die, eliminating the need to purchase multiple tools.
- Fast and accurate fabric cutting: No math required! GO! Setting Triangles dies include the corner and side setting triangles that are difficult to cut by hand. Cut multiple layers in one pass with precision—no rotary cutting or templates required.
- Designed for easy alignment and piecing: Features built-in 1/4" seam allowances and dog-eared corners for accurate assembly and smooth quilting results.
- Expand your quilt design possibilities: GO! Setting Triangles-12" Finished includes ¼" seam allowances and dog-eared corners for easy alignment and piecing. Perfect for creating on-point layouts and adding variety to traditional quilt patterns.
Whats Included
- 1 × AccuQuilt GO! Setting Triangles Die (12" finished), Includes side and corner triangles
- 1 × AccuQuilt GO! Setting Triangles Die (12" finished), Includes side and corner triangles
Reviews
This product doesn't have any reviews yet.
Compare similar products
Don’t let complicated math equations hold you back from creating beautiful projects and quilts with blocks set on point! This die makes it easy - cutting both corner and side setting triangles. Just add your creativity and GO! •AQ Cutting Mat Required: GO! Cutting Mat, 10 in. x 24 in. (25.4 cm x 61 cm) How to Die Cut 12" Finished Setting Triangles: For best cutting results, position fabric on the lengthwise grain (straight of grain) as it goes under the roller. Side Triangles: Cut 9-5/8" x length of fabric (LOF) strip along the selvage edge. Layer up to 6 layers of fabric. Use the Cut & Flip™ method. Start at one end of fabric by placing fabric right side up over the side triangle shapes. Place die through the cutter. Continue to cut and flip by placing fabric wrong side up and align the cut angle of fabric with the angle of blades. Continue to cut side triangles in this manner by flipping the fabric after each cut across the length of fabric. Cut 2 side triangles across the width of 40" of fabric. One yard of 40" wide fabric-cuts 8 side triangles. Corner Triangles: Cut a 9-5/8" strip across the width of fabric. Fanfold into 9-5/8" widths. Place on selected blade and cut. Cut 4 corner triangles across the width of fabric. One yard of 40" wide fabric-cuts 8 corner triangles. Why Quilters Love the GO! 12" Finished Setting Triangles Die: Expand your quilt design options and make on-point quilts with ease! The GO! Setting Triangles-12" Finished die includes the corner and side setting triangles for creating 12" finished on-point quilts. No math required! GO! Setting Triangles dies include the corner and side setting triangles that are difficult to cut by hand. No need to buy two dies! Both corner and side setting triangles included on one die. GO! Setting Triangles-12" Finished includes ¼" seam allowances and dog-eared corners for easy alignment and piecing.
Try the half hexagon for a quilt that looks harder than it is! The half hexagon lets you achieve the hexie look without Y-seams. You'll find this die as easy as the Tumbler! Team this die up with GO! Hexagon-4 1/2” Sides (55438) and GO! Equilateral Triangle-4 1/2” Sides (55429) for variety. •AQ Cutting Mat Required: GO! Cutting Mat, 5 in. x 10 in. (12.7 cm x 25.4 cm) How to Die Cut Half Hexagon Shapes: For best cutting results, position fabric on the lengthwise grain (straight of grain) as it goes under the roller. Cut 9 1/2" strips across the width of fabric. Fanfold into 4 5/8" widths. Place on selected blade and cut. Cut eight half hexagons across the width of fabric. One yard of 40" wide fabric cuts 24 half hexagons. Why Quilters Love the GO! Half Hexagon Die: AccuQuilt has updated the classic half hexagon shape with specially designed dog-eared corners that make the shapes align perfectly without dog ears to trim. Sewing is quick and easy! No templates! No special rulers! The GO! Half Hexagon die includes a unique shape that can be a challenge to cut by hand. The half hexagon lets you achieve the hexie look without Y-seams. You’ll find this die as easy as the tumbler! Try the half hexagon for a quilt that looks harder than it is. GO! Half Hexagon-4 1/2" Sides was designed to be used with GO! Hexagon-4 1/2" Sides (55438) and GO! Equilateral Triangle-4 1/2" Sides (55429) for endless possibilities. Cut half hexagons out of a variety of fabrics: cotton, batiks, wool, felt, flannel, fleece, Cuddle® fabrics and more! A great way to use up scraps. Free pattern downloads available to get you started. Layer Cake-friendly. AccuQuilt Benefits: Cut so much more fabric in less time. Get accurate cuts every time -- No slipping rulers or mistakes Easiest to use -- Simply place die on cutter, then fabric and cutting mat on top Save fabric with Two Tone Foam -- Get more out of your fabric by placing it only over the shape you want to cut.
We've given the traditional tumbler shape an upgrade with specially designed corners that make piecing a breeze. Ideal for scrappy quilts, the GO! Tumbler die cuts these pieces perfectly, every time and even goes through multiple fabric layers like a hot knife through butter. •AQ Cutting Mat Required: GO! Cutting Mat, 6 in. x 12 in. (15.2 cm x 30.4 cm) How to Die Cut Tumbler Shapes: For best cutting results, position fabric on the lengthwise grain (straight of grain) as it goes under the roller. To Fanfold Fabric: Cut 11" strips across the width of fabric. Fanfold into 4" widths. Place on selected blade and cut. Cut 30 tumblers across the width of fabric. One yard of 40" wide fabric cuts 90 tumblers. To Use Scraps: Place scraps or 5" precut squares over tumbler blade areas. Why Quilters Love the GO! Tumbler Die: Tumbler quilts have long been a part of the quilting tradition. AccuQuilt has updated the classic tumbler shape with specially designed corners that make the shapes align perfectly without dog ears to trim. Sewing is quick and easy! No templates! No special rulers! The GO! Tumbler die includes a unique shape that can be a challenge to cut by hand. GO! Tumbler-3 1/2" is a great beginner piecing shape. Tumblers are easy to make and can create interesting quilt designs depending on how the tumblers are laid out. It’s easy to change the size of a tumbler quilt by adding more tumbler shapes to the length or width. Tumblers are not just for piecing. They also can be used for applique as a flowerpot or vase! Just add your favorite GO! applique flowers. Cut tumbler shapes out of a variety of fabrics: cotton, batiks, wool, felt, flannel, fleece, Cuddle® fabrics and more! A great way to use up scraps. Free pattern downloads available to get you started. Charm Pack-friendly. AccuQuilt Benefits: Cut so much more fabric in less time.
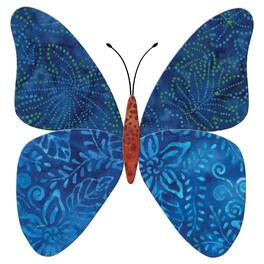
Edyta Sitar is known for her amazing quilts—and now you can appliqué her signature shape with the GO! Butterfly die. The die is specially designed for 10" pre-cut squares, to cut your butterfly shapes and as a background square for your finished butterfly block. Have fun!Create garden scenes by coordinating with other GO! flower and leaf shapes. • AQ Cutting Mat Required: GO! Cutting Mat, 5 in. x 10 in. (12.7 cm x 25.4 cm) How to Die Cut Butterfly Shapes: Apply fusible web product to the wrong side of the fabric, following manufacturer’s instructions, before cutting for fusible appliqué. Place fabric on die right sides together to cut pairs. Upper Wing: Cut and fuse 4 5/8" x 4" rectangles. Layer on selected blade and cut. Cut 10 upper wings across the width of fabric. One yard of 40" wide fabric cuts 70 upper wings. Lower Wing: Cut and fuse 4 3/8" x 3 7/8" rectangles. Layer on selected blade and cut. Cut 10 lower wings across the width of fabric. One yard of 40" wide fabric cuts 80 lower wings. Body: Place scraps on blade and cut. Why Quilters Love the GO! Butterfly Die: Edyta Sitar is known for her amazing quilts – and now you can appliqué her signature shape with the GO! Butterfly die. No template required. The GO! Butterfly die includes applique shapes that are typically difficult to cut by hand. The GO! Butterfly die works great with pre-fused, pre-cut 10" squares fanfolded or cut in half to cut an entire butterfly in one pass thru the cutter (fusible counts as one half layer of fabric). Create garden scenes by coordinating butterfly with other GO! flower and leaf shapes. Cut butterfly shapes out of a variety of fabrics: cotton, batiks, wool, felt, flannel, fleece, Cuddle® fabrics and more! Experiment with decorative stitches and threads to finish your butterfly. A great way to use up scraps. Pattern downloads available to get you started. Layer Cake-friendly.