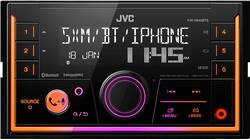
JVC - Built-in Bluetooth - In-Dash Digital Media Receiver - Black
- Key Specs
- App Compatible: false (The product can be connected to a program or software application on a mobile device, which then receives collected data from the product.)
- Bluetooth Enabled: true (The device is capable of communicating with another device via Bluetooth, provided they are within the required range of each other. A Bluetooth-enabled device must also be the same Bluetooth version or higher than the accessory it is intended to pair with.)
- Steering Wheel Control Compatible: true
- Tuner Type(s): AM/FM, Satellite Ready
- CD Player: false
- Screen Size: 0 inches (Size of the screen, measured diagonally from corner to corner.)
- Selectable Color Illumination: true
- Integrated GPS: false
- Works With: Amazon Alexa (Compatible with or able to be connected to other smart devices or applications.)
- General
- Brand: JVC
- Model Number: KW-X840BTS
- Product Name: Built-in Bluetooth - In-Dash Digital Media Receiver
- Color: Black
- Audio
- Watts Per Channel: 50 watts
- RMS Power: 22 watts (The maximum amount of continuous power the device is able to handle.)
- Number Of Channels: 4
- Compatibility
- Mount Style: Double DIN
- App Compatible: false (The product can be connected to a program or software application on a mobile device, which then receives collected data from the product.)
- Mobile Operating System Compatibility: Apple iOS
- Bluetooth Enabled: true (The device is capable of communicating with another device via Bluetooth, provided they are within the required range of each other. A Bluetooth-enabled device must also be the same Bluetooth version or higher than the accessory it is intended to pair with.)
- Steering Wheel Control Compatible: true
- Works With: Amazon Alexa (Compatible with or able to be connected to other smart devices or applications.)
- Tuner
- Tuner Type(s): AM/FM, Satellite Ready
- Number Of Station Presets: 24
- Satellite Radio: SiriusXM Ready
- Players
- CD Player: false
- DVD Player: false
- Features
- Hands-Free Calling: true
- Remote Control Included: true
- Display
- Screen Size: 0 inches (Size of the screen, measured diagonally from corner to corner.)
- Screen Type: LCD
- Touch Screen: false (Touch-screen devices make navigating more intuitive. Using a touch-screen display, you can do things such as tap to select, hold and drag to move items, swipe to scroll, and pinch to zoom.)
- Display Color: Variable
- Selectable Color Illumination: true
- Faceplate Style: Fixed
- GPS
- Integrated GPS: false
- Dimensions
- Product Height: 3.9 inches (The out of box height of the item. Height is measured as the vertical distance from the bottom of the item to the top as it would be primarily used or placed.)
- Product Width: 7 inches (The out of box width of the item. Width is measured as the horizontal distance from one side of the item to the other as it would be primarily used or placed.)
- Product Depth: 3.9 inches (The out of box depth of the item. Depth is measured as the distance from the front of the item to the back as it would be primarily used or placed.)
- Product Weight: 1.8 pounds (The out of box weight of the item.)
- Warranty
- Warranty - Parts: 1 year
- Warranty - Labor: 1 year
- Other
- UPC: 046838080753
Stream music while driving with this JVC digital media receiver. Bluetooth connectivity lets you link up to five devices simultaneously for fun streaming sessions with friends, while the LCD panel offers a wide viewing angle for hassle-free control. This JVC digital media receiver features built-in voice commands so you can select programming while keeping your eyes on the road.
Geek Squad® installation is strongly recommended for this product. Please visit your local Best Buy store for details.
- WAV, WMA, AAC and other playback formats: Offer versatile listening options.
- Tap into your device's music library: Bluetooth connectivity and USB port allow you to connect your device and play music.
- You're ready for Satellite Radio: Features the control and display functionality to support SiriusXM Satellite Radio. Tuner and subscription required for activation (not included).
- Tune in to your favorite radio stations: The AM/FM tuner can be preset to 24 different stations (6 AM, 18 FM).
- Customize how your audio sounds: Use EQ presets to get the perfect audio quality for your music.
- Control your favorite music apps: Once you've connected your phone, you can control the Pandora radio app right from your receiver.
- Apple® iPhone®- and iPod®-ready: Lets you connect your compatible cell phone or portable audio device, so you can control music playback.
- Manage music, settings and functions using the LCD display: Clearly displays information.
- Connect your receiver to devices and speakers: Use the 3.5mm auxiliary input or the USB port to connect your device.
Whats Included
- JVC KW-X840BTS
- Wired microphone
Product Manuals
A: This radio will fit your vehicle. As for installation fees please call our Best Buy installation team to check to see what installation promos might be available.
Q: Will it work on an 04 Honda CRV and does it need special wiring harnesses?
A: The answer is yes. When you select any stereo on Best Buy site there is a link that says “let’s see if this fits your car” when you click it you enter your info and it will tell you. Also when you add it to your cart it tells you if you need additional wiring. You will also need a new beauty ring (to make it look like it naturally came in your car) Expect about $100 more than the listed stereo cost. Hope this helps.
A: I have a Samsung Galaxy 9S and it works great.
Q: I know this has multiple changing colors but can you pick just 1 color?
A: It does give you the option to select one color as well.
Q: Can I ad a subwoofer to this unit ?
A: Yes, it has RCA outs that will send the signal to your amp and you also connect the wire to turn the amp on and off with the radio. Works great and a pretty cool unit for the price.
Q: How many watts is this unit ?
A: The radio offers 50 watts per channel.
Q: Can you receive phone calls through this system?
A: Yes, it alerts you to an incoming call and allows you to answer. You can also add contacts and it displays who is calling
A: To set the time, simply: 1. Power up the unit 2. Press and hold the menu button for 2 seconds 3. Turn the volume knob and select CLOCK and press the knob to enter 4. Turn the knob to select CLOCK ADJUST and press the knob to enter 5. Use the knob to adjust the time accordingly 6. Turn the knob to select DATE SET and press the knob to enter 7. Use the knob to enter the date accordingly 8. Press MENU to exit
Today's top picks
 $479.99The price was $729.99
 $199.99The price was $249.99
 $789.99The price was $1,049.99
 $799.99The price was $1,199.99