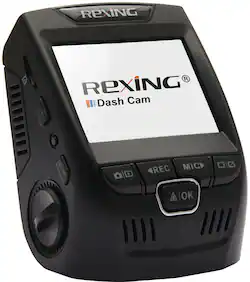
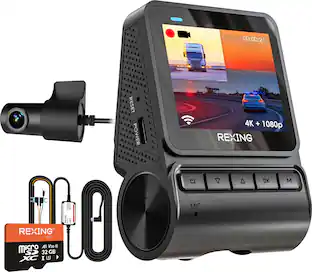
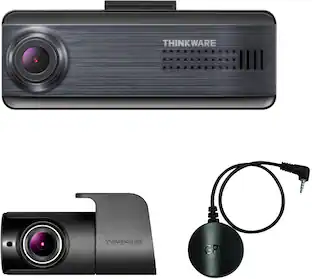
Rexing - V1 Plus Dash Cam - Black
- Key Specs
- Field of View: 170 degrees
- Automatic Incident Detection: true
- G-Sensor: true
- Recording Resolution: 1080p (Refers to the number of pixels, both horizontally and vertically, used to capture video. The higher the resolution the finer the video detail that can be seen.)
- Compatibility: Universal
- Camera Mounting Location: Windshield
- Vehicle Camera Type: Dashboard
- General
- Brand: Rexing
- Model Number: V1-PLUS
- Product Name: V1 Plus Dash Cam
- Color: Black
- Vehicle Camera Type: Dashboard
- Recording & Playback
- Field of View: 170 degrees
- Automatic Incident Detection: true
- G-Sensor: true
- Recording Resolution: 1080p (Refers to the number of pixels, both horizontally and vertically, used to capture video. The higher the resolution the finer the video detail that can be seen.)
- Frame Rate: 30 frames per second (The frequency at which consecutive images can be captured. The higher the frame rate, the more detail that can be captured.)
- Loop-Cycle Recording: Yes
- Image Sensor Type: CMOS (CCD and CMOS are the two main technologies used in image sensors. CCD, the older of the two types, turns analog light signals into digital pixels. This conversion happens without distortion, resulting in high-quality images. Newer CMOS sensors use transistors at each pixel to move electrical charges. CMOS sensors are typically less expensive, but also require more light to create distortion-free images.)
- Camera Power Source: Vehicle battery
- Expandable Memory Compatibility: microSD
- Recording Feature: true
- Compatibility
- Compatibility: Universal
- Display
- Screen Included: true
- Screen Resolution: 320 x 240 (Screens come in a range of resolutions (measured in pixels, horizontal x vertical). The higher the resolution, the greater the picture quality.)
- Mounting
- Camera Mounting Location: Windshield
- Mount Included: true
- Mount Type: Adhesive
- Input
- Number Of Auxiliary Inputs: 0
- Number of USB Port(s): 1
- Dimensions
- Product Height: 3 inches (The out of box height of the item. Height is measured as the vertical distance from the bottom of the item to the top as it would be primarily used or placed.)
- Product Width: 6.75 inches (The out of box width of the item. Width is measured as the horizontal distance from one side of the item to the other as it would be primarily used or placed.)
- Product Depth: 5 inches (The out of box depth of the item. Depth is measured as the distance from the front of the item to the back as it would be primarily used or placed.)
- Product Weight: 1.2 pounds (The out of box weight of the item.)
- Warranty
- Warranty - Parts: 1 year
- Warranty - Labor: 1 year
- Other
- UPC: 857080006497
Only at Best Buy
Record your every move on the road with this Rexing V1 Plus dash cam. Front-facing and rear-facing mount options let you choose the angle you want to capture, and the viewing screen means this dash cam can double as a backup camera. With included mounting materials, this Rexing V1 Plus dash cam is easy to install.
- Wide dynamic range: Allows the camera to perform optimally in any lighting situation by adjusting the exposure to create balanced images and footage.
- 1080p Full HD recording: Captures sharp high-definition footage at 30 fps.
- 170° viewing angle: Enables expansive shooting coverage with minimal edge-to-edge distortion.
- Integrated display: Provides clear view and 320 x 240 resolution.
- Built-in G-sensor: Supports emergency video file backup when an accident happens.
- 32GB microSD card included: Offers convenient and long-lasting operation.
- Adhesive mount: Ensures simple mounting.
- Discreet design: The camera mounts to the windshield, staying concealed from outside the car.
- Loop recording: Video can be recorded in 3, 5, or 10 minute intervals. When the storage limit is reached on the memory card, new recordings will automatically overwrite oldest recordings.
- High temperature resistance: With a 140°(F) operating and a 160°(F) storage temperature.
Whats Included
- Rexing V1 Plus Dash Cam
- Mini-USB hardwire kit
- 32GB Kingston Canvas microSD card
Product Manuals
A: This camera is strictly run via power from the car, there is no internal battery in the camera to replace The cigarette lighter loses power by design when you turn the ignition off, so the camera will also lose power, that's not a fault with the camera. Anything plugged into the cigarette lighter works like that. If you want continuous power you'll need to use something other than the cigarette lighter.as a source. You'll need to connect the camera power cord to either an "always powered" fuse in the car's inside fuse box, or splice the power cable into another car cable that is also always powered. That one is not advisable unless you are certain what you are doing. There's a video on the Best Buy product page that shows the fuse connection method.
Q: What version is this (Not V1 but what version of the V1)
A: V1P Gen2
Q: Can I mount on dash instead of windshield?
A: No. On the windshield. 3M tabs hold very well.
Q: Can this be powered by a USB outlet in the vehicle instead of a cigarette lighter outlet
A: undefined
Q: Time: how do you change military time to regular time?
A: undefined
People also viewed
 $159.99The price was $199.99
 $119.99The price was $149.99


Today's top picks
 $479.99The price was $729.99
 $69.99The price was $129.99
 $199.99The price was $249.99
 $49.99The price was $62.99