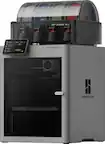
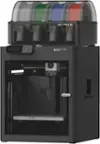
Philips Pasta and Noodle Maker Plus - HR2375/06 - White And Silver
User rating, 4.3 out of 5 stars with 29 reviews.
4.3(29 Reviews)- Be the first to ask a question
How it's going to work:
- Every few minutes, we're going to release more inventory.
- Shortly, the button below will turn back to yellow (unless we sell out).
- At that point, try adding it to your cart again.
Pro Tip: If that works, checkout as fast as you can. It won't be reserved until you are in checkout. Good luck!
Cardmember Offers
carousel
Description
Features
Powerful and fully automatic mixing, kneading and extruding, the Philips Pasta and Noodle Maker allows you to make a pound of fresh pasta or noodles with ease. Just add ingredients and it does the rest creating 2-4 portions in minutes
Dare to experiment and create delicious gourmet, gluten free and healthy colorful pastas for your family and friends.
Includes: 4 shaping discs: Spaghetti, Fettuccini, Penne and Lasagna/Dumpling; pasta/noodle cutter, cleaning tool and measuring cup.
With detachable and dishwasher safe components, the Pasta Maker can be easily setup, dismantled and cleaned.
A smart storage drawer in the bottom of the machine hold all the shaping discs and cleaning tools
What's Included
- Pasta Maker, Cleaning tool, Measuring cup, Recipe booklet, 4 shaping discs.
General
- Product NamePhilips Pasta and Noodle Maker Plus - HR2375/06
- BrandPhilips
- Model NumberHR2375/06
- ColorWhite And Silver
- Color CategoryWhite
Warranty
- Manufacturer's Warranty - Parts12 Months
- Manufacturer's Warranty - Labor12 Months
Other
- Product Width12.4 inches
- Product Height8.5 inches
- Product Weight15.2 pounds
- Product Length13.5 inches
- UPC075020080974
Customer rating
Rating 4.3 out of 5 stars with 29 reviews
(29 Reviews)Customer images
Search
Rating 4 out of 5 stars with 1 review
Pasta fun!
Posted .There are two kinds of pasta - extruded and laminated. Laminated pasta is the most common kind people make at home as it does not require any special tools - just roll the dough and cut it, or use "pasta machine" that rolls the dough for you. It's typically much more difficult to make extruded pasta at home. Extruded pasta is made by forcing the dough thru the cutting die that shapes the pasta, it's the only way to make hollow pasta as well. Extruded pasta has rough edges and sauce does stick better to it. This pasta maker is a great device to start making extruded pasta at home! Everything you need is in the box and machine comes pre-assembled, just make sure to wash it before the 1st use, add flour, add liquid (water or water plus egg) and machine will do everything else for you. It's extremely easy to operate even for kids! No hand mixing of ingredients! It does take the machine about 3 minutes to make the dough and then about 3 minutes to extrude (force the dough thru the cutting die) and you are ready to cook the freshly made pasta. You can use any flour and substitute water with any vegetable juice you would like so there are a lot of options. Spaghetti, Penne, Angel hair and "pasta sheets" shaping dies are included with the machine and more dies are available to purchase separately. Cleaning is easy and it's oddly satisfying to use the included cleaning tool to poke the dry dough out of the dies. Overall - it's a great appliance for any family who enjoys pasta at home, makes it super easy to make it! Recipe book is included. Few things I did not like that much: 1. My biggest problem is with the "pasta sheets" cutting die which is supposed to make flat sheets of pasta usable for lasagna, ravioli, etc. Mine came with the cutting disk off center so it has a wider gap between the cutting disk and a die itself up top - this makes pasta come out quicker on the top side, therefore my pasta sheets do not come out flat. It's very difficult to use those for anything. I've contacted Phillips and they sent me a replacement cutting die right away, unfortunately it has the same problem... 2. Spaghetti come out in a bunch so it's kinda difficult to separate them if I want to dry them on a pasta drying rack first. Not impossible, but regular pasta cutter makes this job a lot easier. You have to dry your pasta if you want to cook it al-dente (fresh pasta can't be cooked al-dente obviously). 3. Dough gets stuck on the paddles sometimes and does not want to go into extruder. I have to pause the extrusion process a few times and help the dough to the front of the machine or machine will just be done with a bunch of dough sill sitting inside (running the extrusion program once again does not help). 4. Machine wastes about 36 gramm (1.3 Oz) of dough that just gets stuck in the extruder. Not much, just so you know. Minimum pasta portion you can make per cycle is about 300 gramm which is enough for 3 servings, maximum is about 600 gramm per cycle.
I would recommend this to a friendRating 5 out of 5 stars with 1 review
A revelation for someone who's never had homemade!
Posted .We love pasta, but thanks to our experience with this pasta maker, we realized that it was really just in an "Olive Garden Italian" kind of way. We'd pay a little more for an expensive, "authentic-looking" package of pasta when we felt adventurous enough to make some at home, but it never occurred to us that we might be able to MAKE our own, perhaps even better, pasta that would be about as much fun to make as it was tasty to eat. Enter the Avance pasta maker. This unassuming gadget is a bit bigger than we expected, but it's very solidly built and comes with everything you need to get started trying/making your own pastas at home (except the ingredients, of course): some shaping discs for different pasta styles like spaghetti, penne, lasagna, etc., a tool that resembles a small windshield ice-scraper to cut the pasta to length as it emerges (Play-Dough style) from the front of the machine, and a specially designed cleanup brush and measuring cup. Sure, there is plenty of inspiration on YouTube or around the net for pasta recipes, but there was actually a very nice and reasonably extensive recipe book in the box to produce a multitude of flavors and textures for your next pasta meal. Note that the ratio of the dry to liquid ingredients in each recipe seems to be pretty important to get the extrusion process (squishing the noodles out of the shaping disc) in this machine to work properly, or even at all. The manual warns that the pasta maker was tested to success using their ingredient ratios, so any outside recipes or just "winging it" may have to involve a little math or experimentation to get satisfactory results from this machine. We made several different styles of pasta and each was very tasty and at least as good as any store-bought pasta, but the noodles had far more texture to grab the sauces and meats in the pot. It was definitely a different sensation than the kind of processed-smooth "Americanized" pasta we've gotten used to over the years, but the results won us over; even our super-fussy but pasta-loving kids consistently liked the results--I can't think of a more glowing recommendation than that. Pasta making with this machine is dead simple. Pour the ingredients in the hopper, close the lid, turn it on, adjust the number of servings you intend to make using the button on the mercifully simple control panel, hit the Start button, and the machine [mostly] does the rest. It will start mixing and kneading, and once it does, you pour the water, or water & egg liquid, through a slit in the top of the lid. Then the machine continues on its merry way...7-10 or so minutes later--you get a beep, and the pasta starts extruding from the front of the machine. When the noodles hit the desired length, slide the cutter across the front of the shaping disc to cut the pasta as it emerges, and set it aside. The whole ordeal should take you maybe 10-20 minutes depending on how many servings you make. I was really surprised by how the dough looked when it was ready to start the extrusion process because it was still kind of loose and flour-like, nothing like what I traditionally associate with "dough." But we let the process continue and were very pleasantly surprised by the final results; I think you will be too, especially if you've never really tried your hand at home-made pastas before! A few little niggles are worth mentioning. We found there was a bit of wasted dough when it was done, even after hitting the Extrusion Only program (about 3 minutes to run) to squeeze what little more we could from what was left over in the hopper. And maybe it was just us, but we needed to make least 2 batches to feed a family of 4; if you have some true pasta lovers on tap, we figure it will most likely take about 3 batches to satisfy a family that size, still with little to no leftovers. Fortunately, cleanup was [mostly] an easy affair. Everything comes apart simply by unscrewing the 2 front knobs; and everything that does separate from the main unit is dishwasher safe except for the front face-plate. The shaping discs were another matter. Other Philips pasta makers with these kinds of discs have included a little push-piece that mated to the holes in the shaping discs; you simply pressed down and it forced the pasta out of the holes. Maybe they didn't work well, or maybe it was to save on costs, but here, you get a little cleaning brush with a small poker at the other end to sweep and poke the pasta dough out of all the holes. It's not difficult, but it does take a couple of minutes to really get everything cleaned up. However, once you're done, virtually everything fits in a little pull-out drawer at the front of the unit--the discs, cutter, and brush/poker. The only thing that doesn't stow away neatly with the pasta maker is the measuring cup; but we absolutely LOVE having everything else in one place and not having to go searching for the right disc when we need it. We have really enjoyed using this unit--so much so that we're considering buying a few other shaping discs separately to try our hand at angel-hair or rigatoni, too. Bottom line--for people who love pasta, but admittedly never had fresh, homemade pasta until now, we were absolutely impressed by the cooked texture and flavor of what we could make at home; definitely recommended.
I would recommend this to a friendRating 4 out of 5 stars with 1 review
Great fresh pasta when you learn how to use.
Posted .When unboxing this machine the typical instructions are easy to follow but it was complicated and not very clear. The cup provided with instructions were not clear and our first batch did not hve enough flour. When watching a You Tube review I realized where we went wrong and the. We had some great fresh pasta. I like the machine but the instructions would make your average user frustrated and possibly return it as faulty.
I would recommend this to a friendRating 5 out of 5 stars with 1 review
Ready for becoming a Pasta Sous-Chef?
Posted .My wife and I are big into making our own pasta and as such, have always been eyeing on the Philips HR2375 Pasta Maker, which promises to make ready-to-cook pasta in about 10 minutes. We were delightfully surprised how effortless (and quiet!) the Philips Pasta Maker performs, and, indeed, delivers on its promise. 2 cups os flour (500g/17.6 oz; we used a kitchen scale), some water and 1 egg (using the supplied water cup), and 10 minutes regular program + 3 minutes running the Extrusion-only program later, we had enough delicious pasta to feed 4 folks. Making pasta was easy as pie and totally effortless. And: It was fun watching the machine making the pasta! The pasta maker comes with 4 different "Shaping Discs": Spaghetti, Fettuccine (wide noodles/Ramen; my favorite!), Penne, and Lasagna. If these 4 are not enough, there are more shaping discs available for separate purchase: Capelli d’Angelo (angel hair pasta), Tagliatelle (flat noodles), Thick Spaghetti and Pappardelle (wide, ribbon-shaped pasta). There is also a recipe book that shows you different ways/flavors of making pasta, for example, carrot pasta, wow! This machine gets you hooked: You always feel like wanting to try out more and ultimately finding your own pasta flavors. Taking into account my wife's total excitement, we give this machine a very well deserved 5 stars across the board, including the fun factor, and most importantly: the results: Pasta of all sorts that tastes exactly the way you want, no compromises.
I would recommend this to a friendFeatures
Quality5 out of 5Value4 out of 5Ease of Use5 out of 5Rating 5 out of 5 stars with 1 review
Home-made pasta made easy
|Posted .Owned for 3 weeks when reviewed.Features
Quality5 out of 5Value4 out of 5Ease of Use5 out of 5So easy, will never buy pasta again. If using semolina flour I found 3.7 Oz works best.
Features
Quality5 out of 5Value4 out of 5Ease of Use5 out of 5I would recommend this to a friend- Pros mentioned:Set upCons mentioned:Instructions
Rating 5 out of 5 stars with 1 review
Great for home chefs
Posted .Pros mentioned:Set upCons mentioned:InstructionsThe Philips Avance Pasta Maker HR2375 is an update to the longstanding HR2357 – confusing numbering for sure. I don’t have any experience with the outgoing model, so I will only be able to focus on this current model. First of all, for me, I have always wanted a pasta maker. I have made pasta by hand – rolling pins, cutters, and flour everywhere. I used to have a Kitchenaid Mixer, and always wanted the pasta maker attachments for it, but it was pushing out of my price range to get all the pasta types I wanted. I don’t have that mixer anymore, so its not even an option. To be honest after using the Philips Avance Pasta Maker, I have no regrets about holding off on the Kitchenaid set. The Avance system is so well done, that anyone can make fresh pasta with it. The pasta maker comes with 4 attachment dies out of the box. Fettuccini, spaghetti, penne, and lasagna. I’ve tried all of them except the lasagna – mainly because I make lasagna once a year for non-traditional Thanksgiving dinner. Based on the performance of the other 3, I am pretty confident the lasagna die will perform admirably. So far, my recipes have been pretty tame – just flour and water. At some point I will explore egg noodles, spiced noodles, various flours, etc. The only thing I wish I could have done was get my hands on some semolina flour – makes for better pasta structure/texture. I used all purpose flour, which was certainly OK for my first few runs. My first run with the machine unfortunately didn’t go so well. I followed the instructions in the manual (I included a picture of the page), and ended up with an extremely sticky batch that wouldn’t even extrude. The manual says 1 cup of flour/8.8 oz, and the fill the included measuring cup up to the first line with water (about ½ cup). Turns out 1 cup of flour is 4.25 oz, so just under half the amount necessary for that first line of water. If I had a kitchen scale I could have measured up to the 8.8, but I don’t have one. So for quick reference – 2 cups of flour and ½ cup of water makes a single batch. The chart is misleading, and if you follow it to the letter, you will get sticky dough. So, on to making the dough. Assembly of the machine is pretty straightforward. The container pops into its spot and mixer/extruder goes into its obvious place. Attach the pasta head type of your choice to the plastic front – they are keyed into a certain position, so they go in a certain way. The extruder slides into its tunnel on the plastic front, and the metal front pops on. Screw it into place tightly and you are ready to go. Measure out 2 cups or 8.8 oz of your type of flour (for 1 batch) and drop it into the mixer container. You can pick from a number of different types – experiment! Measure out the water or water/egg to the prescribed line. Start the mixer up, and slowly pour it into the container through the slots on the lid. Mixing takes about 3 minutes, and then the machine beeps and starts the extruder process. Be ready with the included scraper! The pasta will extrude over the next 10 mintues. It goes pretty fast at first, so be ready. When the pasta starts have a plate or bowl ready underneath to catch the cut pasta. I never tried drying the pasta after making it, I always tossed it straight into a boiling pot. My tip for cooking the pasta – toss in one noodle cook for a minute, try it. If its good, then toss the rest. If not keep incrementing a minute until the proper cook level is achieved. I didn’t do that for the first batch and ended up with overcooked noodles. All batches afterwards were perfect with the incremental method. Cleanup was straightforward. Don’t let pieces sit and or it will turn into concrete. Scrape off what you can before tossing it into the sink. The manual also suggests putting pieces in the freezer and cracking the dough off. I haven’t tried that but I can see how that would work. For the most part I just blast the dough bits off with hot water, wash them, and set to dry. Overall the Philips pasta maker is a really great kitchen appliance. I used to only make pasta once or twice a year. In the last week and a half, I’ve done it 4 times. Its so easy to use, cleanup isn’t all that bad, and the end product is delicious. Also, you can pick up other pasta shapes to go with the machine. They run $25 for a set of 2, so if the 4 included aren’t your speed then you can snag some other varieties for a reasonable cost.
I would recommend this to a friend Rating 4 out of 5 stars with 1 review
Fresh pasta in no time...pretty easy cleanup
Posted .I would recommend this to a friendWhat a great addition to my arsenal of kitchen gadgets! Alright, so maybe it’s a little on the large side to be considered a gadget, but…you know…. The Philips Avance Automatic Pasta Maker really delivered in my opinion. I have never owned an automatic pasta/noodle machine. I have however made pasta the old-fashioned way several times just for fun with the kids. Making pasting by hand is quite messy and time consuming. This machine made it an absolute cake walk by comparison. The unit seems to be sturdy and well-constructed. It is a simple efficient device. It’s heavy and has a decent sized footprint, but I don’t feel like it is overly bulky considering the hopper size and motor power required to extrude thin pasta I took time to read the instruction manual in full before operating the device. I recommend doing so. By the time I tried to make pasta, I felt like I understood what was going to happen and how I was supposed to add ingredients. I personally think that trying to wing it will not provide quality results. In fact, my parents got the same unit a few days after I did. They did not heed my advice and tried to wing it since they "already know how to make pasta". It did NOT turn out well at all and ended up getting thrown away. Don't be too proud to follow instructions on this one. I highly recommend measuring out your flour and water by weight in grams vs by volume and fluid oz. I get that it’s the big scary metric system, but it really does make a different. Pasta is a bit of a science. If you can afford this toy, you can afford a cheap digital scale to go with it. My first batch of pasta really couldn’t have gone better. We chose spaghetti for our first run. I let my 12 and 14 year old kids do all the measuring and cutting. They had a blast. It really is as simple as advertised. We measured out the all-purpose flour and dumped it into the hopper. I added a pitch of salt and we hit the button as instructed. It spent the next 3 minutes mixing the dough. As instructed, we added the water slowly by pouring it a little at a time across the spout on the top of the hopper lid. I do think this is important. Don’t just dump the water in. In fact, the design really prevents you from adding the water too quickly. The spout is shallow, and if you pour too quickly, it will run off the edge of the lid instead of going into the machine. If you find yourself frustrated because you are dumping water on your counter it means you are trying to pour too quickly. At the end of 3 minutes, the mixing screw reverses direction and the auger begins to push the dough through the nozzle. I was impressed with the consistency of the dough. It held together well and was easy to cut to length with the included cutting spade. We really did have fresh pasta ready to cook in less than 10 minutes. I’ve heard some people complain about clean up. I can’t imagine what they are expecting. Having made pasta the old-fashioned way, this is a snap. All the mixing components are dishwasher safe. I used the included cleaning pick to poke the left over dough out of the little spaghetti sized holes before throwing things in the dishwasher, but other than that I did nothing but throw scrap dough bits in the trash. All the pieces came out of the dishwasher perfectly clean and ready for use once again. I don’t know exactly how much it made in a batch, but I’m guessing I got about 10-12 oz. It didn’t look like quite enough for our clan of 4, so I immediately made a 2nd batch that was just as easy as the first…no cleaning in between since it was the same recipe. We dropped the fresh pasta into salted boiling water for about 4-5 minutes and presto…ready to eat. Keep in mind that fresh pasta doesn’t need to cook for very long. It will get mushy and starchy if you cook it too long. I also highly recommend rinsing it in cold water as soon as you drain it to stop the cooking process and help keep it from sticking together. It’s also not a bad idea to add a splash of olive oil to the cooked pasta to further help keep it from sticking together. If I had to find something to whine about, I would point out the that attachment drawer on the front of the unit is a little finicky to open and close, but everything fits just fine. I also noticed on both batches that there is one little spot in the hopper where a small ball of dough gets caught and doesn’t make it through to the extruder. I simply paused the unit when the hopper was just about empty, opened the lid, and threw the dough ball back into the bottom. It has no problem picking it up the 2nd time around on either batch. It would be nice if it made a little more in a batch, but at the same time, I don’t really want the unit to be much larger, so it’s probably fine like it is, just know that if there are more than 3 people eating, you will likely need to plan for more than 1 batch. The recipe I used was just all-purpose flour, water and salt. I would say it had more of a ramen noodle consistency vs traditional Italian pasta. The instructions recommend mixing a couple of different types of flour in order to get different consistencies/pasta types. My family had no problem with the straight all-purpose flour recipe we used…they loved it. That said, I have ordered some different flours to play with and I’m looking forward to experimenting with veggie juices and herbs to created unique pasta flavors and textures. I really enjoy this unit and I would have no reservations about recommending it to anyone who enjoys scratch cooking vs boxed food options.
Rating 4 out of 5 stars with 1 review
Takes some practice
Posted .I would recommend this to a friendI made several batches of pasta and had varied results. I had to purchase a digital scale to weigh the flour. I wish the instructions called for cup measurements instead of gram weights. I used the same mixture of semolina and all purpose flour for all 3 batches. I whisked the mixture and then sifted it before putting it in the machine. The first batch I made was spaghetti. I followed the directions, which are partly in the manual and partly in the recipe book. The mixture looked dry and I thought I had failed. The spaghetti was extruded and tasted fine but I found when cleaning up that there was a large amount of liquid on my kitchen counter. I reread the directions and found that while I had turned the machine on, I hadn't started "the program" as instructed and leaking was the consequence. The pasta was fine but there was some unmixed flour left over. The next batch I made penne. I beat the egg/water mixture with a fork in the supplied measuring cup. I guess I didn't mix the egg and water well enough. The gelatinous parts of the egg clogged the slots that you pour the liquid through. I had to force the egg solids through the slots. I started the program before pouring the liquid this time. The mixture was soft and did not feed through the extruder. I had to stop the machine and put the dough in the feeder a number of times. The penne was wet and soft, the tubes collapsed and stuck together. It did not cook well. Edible but not very good. The next batch I made fettuccini. I beat the egg, filled the supplied measuring cup a bit under the line with water, poured the mixture into a separate bowl and mixed well. This time it drained through the feeding slots, mixed well and made great pasta. While this makes great pasta and is way less trouble than the Atlas hand crank pasta roller/cutter I have used for decades, I'm still not comfortable that I have mastered this machine. I wish the instructions were all in one place and a bit better. Practice makes perfect, unfortunately I feel like I need more practice. I guess 2 out of 3 tries isn't bad.
Be the first to ask a question.
We’ll try to get your question answered within 24 hours by a Best Buy customer or brand representative.
Ask a Question