A:Answer Hi jomama.
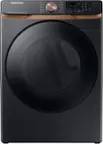
Thank you for reaching out regarding your Samsung - 4.5 Cu. Ft. High-Efficiency Stackable Front Load Washer with Vibration Reduction Technology+ if you can use a water hose and hook it up on the sink. Regarding your concern, yes, you can as long as the following requirements are met. Here are the requirements.
Proper water pressure for this washer is between 20-116 psi (137-800 kPa). Water pressure less than 20 psi (137 kPa) may cause the water valve not to close completely. Or, it may take longer to fill the drum, causing the washer to turn off.
Water taps must be within 4 ft. (122 cm) from the rear of the washer so that the provided inlet hoses reach the washer.
I will be sharing this link to your user manual for further assistance. Please go to page 17.
https://downloadcenter.samsung.com/content/UM/202003/20200323131637312/WF6000T_SEHC_DC68-04006F-01_EN_CFR_MES.pdf
Should you need more assistance, please feel free to get back to us via the following options:
1. Facebook Messenger: http://m.me/samsungsupport
2. Twitter: https://twitter.com/messages/compose?recipient_id=18768513
3. Samsung Community: https://us.community.samsung.com/t5/Samsung-Community/ct-p/us
Thank you for being a valued customer of Samsung. Have a great day.
Reference Ticket Number: 1144257657
^Camille