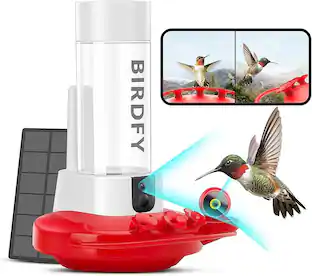
Bird Buddy - Smart Hummingbird Feeder with Solar Roof - White
- Key Specs
- Product Height: 7.9 inches (The out of box height of the item. Height is measured as the vertical distance from the bottom of the item to the top as it would be primarily used or placed.)
- Product Width: 9.5 inches (The out of box width of the item. Width is measured as the horizontal distance from one side of the item to the other as it would be primarily used or placed.)
- Product Depth: 7.7 inches (The out of box depth of the item. Depth is measured as the distance from the front of the item to the back as it would be primarily used or placed.)
- Product Weight: 5 pounds (The out of box weight of the item.)
- App Compatible: true (The product can be connected to a program or software application on a mobile device, which then receives collected data from the product.)
- General
- Brand: Bird Buddy
- Model Number: BWH1025BAA
- Product Name: Smart Hummingbird Feeder with Solar Roof
- Color: White
- Dimensions
- Product Height: 7.9 inches (The out of box height of the item. Height is measured as the vertical distance from the bottom of the item to the top as it would be primarily used or placed.)
- Product Width: 9.5 inches (The out of box width of the item. Width is measured as the horizontal distance from one side of the item to the other as it would be primarily used or placed.)
- Product Depth: 7.7 inches (The out of box depth of the item. Depth is measured as the distance from the front of the item to the back as it would be primarily used or placed.)
- Product Weight: 5 pounds (The out of box weight of the item.)
- Compatibility
- App Compatible: true (The product can be connected to a program or software application on a mobile device, which then receives collected data from the product.)
- Wireless Connectivity: Bluetooth, Wi-Fi (The manner in which a device sends data to another device over a short distance without the use of wires or cables.)
- Operating System Compatibility: Android, Apple iOS
- Capacity
- Food Capacity: 1 cups
- Features
- Built-in Camera: true
- Streaming Video: true (The ability to transmit a live video feed from the product.)
- Wet/Dry Food: Wet
- Programmable Feed Times: false
- Programmable Portion Size: false
- Anti-Clogging Design: true
- Sealing Lid: true
- Indoor Or Outdoor Use: Outdoor, Indoor (Indicates the appropriate environment product was designed to be used in.)
- Power
- Power Source: Battery-powered
- Rechargeable Battery: true
- Battery Chemistry: Lithium-ion
- Warranty
- Warranty - Parts: 2 years
- Warranty - Labor: 2 years
- Other
- UPC: 850035422182
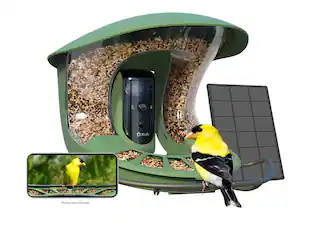
Witness the magic of hummingbirds in your backyard! Bird Buddy's Smart Feeder uses AI to recognize and capture stunning close-ups, while the specially designed feeder attracts these dazzling creatures.
- Safe for Hummingbirds: Designed with ornithology experts, the flower ports have a meticulously calculated radius, which prevents the hummingbirds from getting stuck, while still easily reaching the nectar.
- Easy refills: The nectar basin seamlessly detaches from the stem with a simple twist, and clicks back into place once you’ve topped it up.
- Powered by solar energy: The optional detachable Solar Roof add-on is an eco-friendly charging option which provides continuous charge during daylight.
- User-friendly app: The Bird Buddy app is supported by all Android devices updated to Android version 8.0 or higher and on all iOS devices updated to iOS version 14.5 or higher. This includes phones and tablets.
Whats Included
- Smart Hummingbird Feeder
- Detachable Solar Roof
- USB-C Charging Cable
- Metal Hanger
- Cleaning Brush & 2x Closed Flower Ports
Q: What are the dimensions of the feeder?
A: The feeder is 7.9 inches high, 9.5 inches wide, and 7.7 inches deep.
Q: What kind of battery does the feeder use?
A: The feeder is powered by a rechargeable lithium-ion battery.
Q: Does the feeder have a sealing lid?
A: This feeder does have a sealing lid.
Q: What is the warranty on the feeder?
A: The feeder comes with a two-year warranty on both parts and labor.
Q: How much food can the feeder hold?
A: The feeder has a food capacity of one cup.
Q: Does a hummingbird have to land on it to record?
A: Thanks for your question! 😊 Yes, the camera captures visits when birds land on the feeder - but you can also start a livestream anytime to capture the activity.
People also viewed
 $199.00The price was $279.00
 $199.00The price was $299.99
 $109.99The price was $129.99
 $119.99The price was $134.99
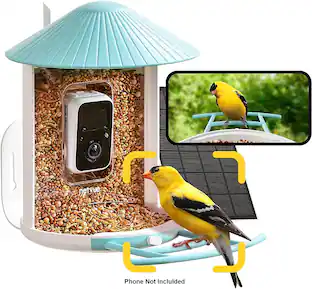 $169.99The price was $199.99
 $109.99The price was $129.99


Today's top picks
 $64.99The price was $84.99
 $299.99The price was $349.99
 $289.99The price was $349.99