This article discusses how to delete temporary files or empty an internet browser's file cache.
How to Delete Temporary or Cache Files in an Internet Browser

- Click the menu icon "⋮" icon and select "Settings" (See Chrome Figure 1).

Chrome Figure 1
- Click "Search Settings", then type "cache" and select "Clear browsing data" (See Chrome Figure 2).
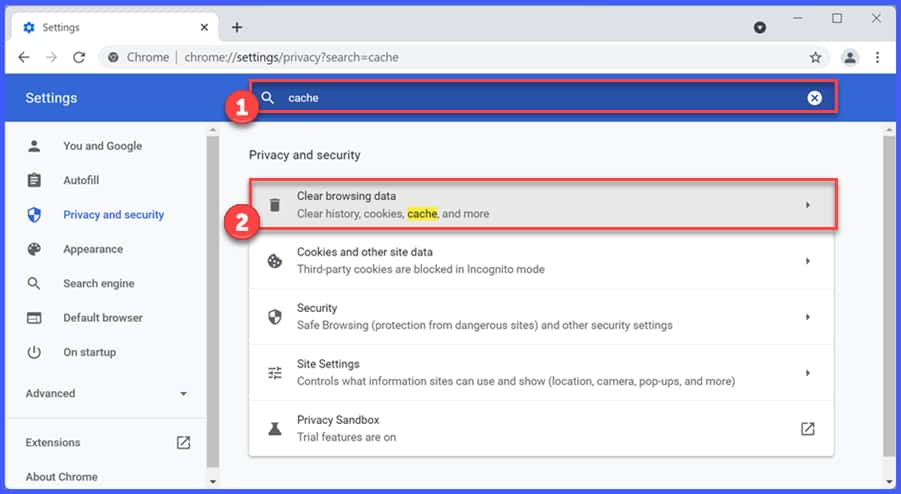
Chrome Figure 2
- Click the drop-down next to "Time range" and select "All time" (See Chrome Figure 3).
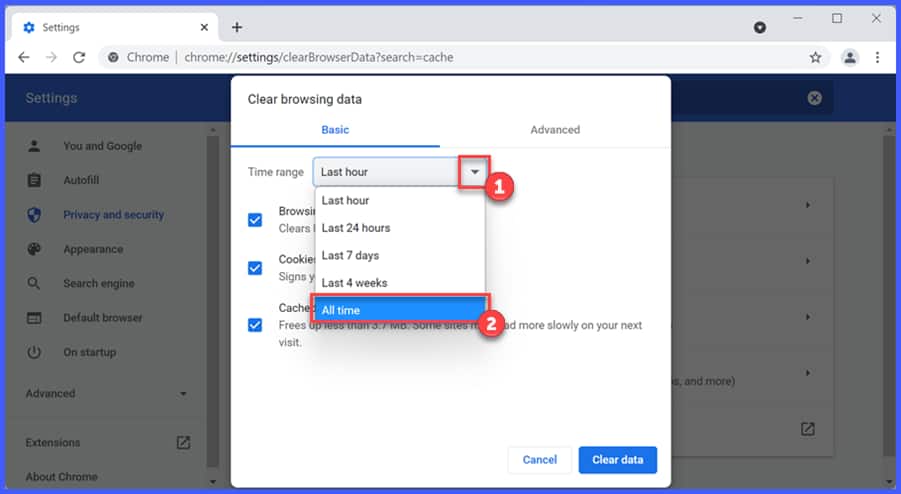
Chrome Figure 3
- Click "Clear data" (See Chrome Figure 4).
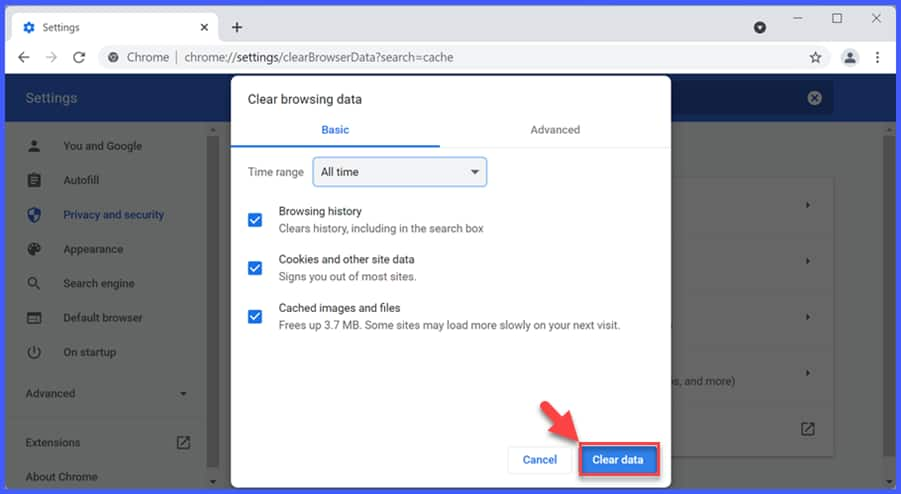
Chrome Figure 4

Delete History/Cache
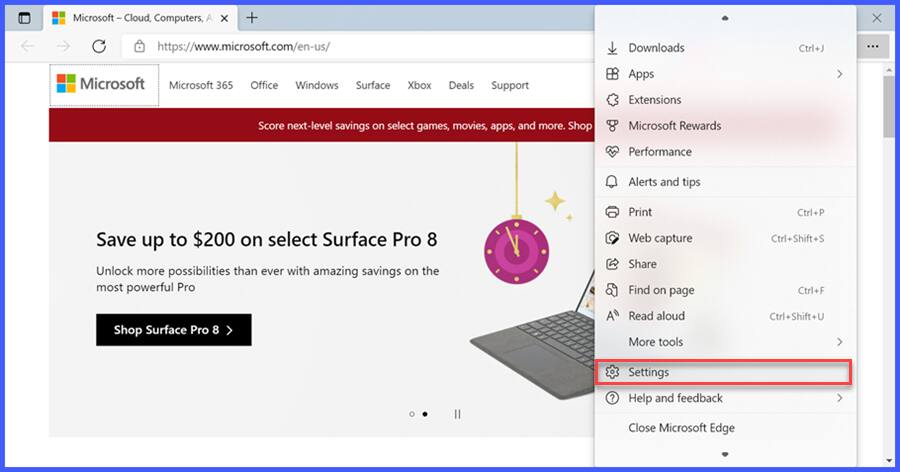
- Click the "..." menu icon (See Edge Figure 1).
Edge Figure 1
- Click "Settings" (See Edge Figure 2).
Edge Figure 2
- Select "Search Settings", then type "cache" and click "Choose what to clear" (See Edge Figure 3).
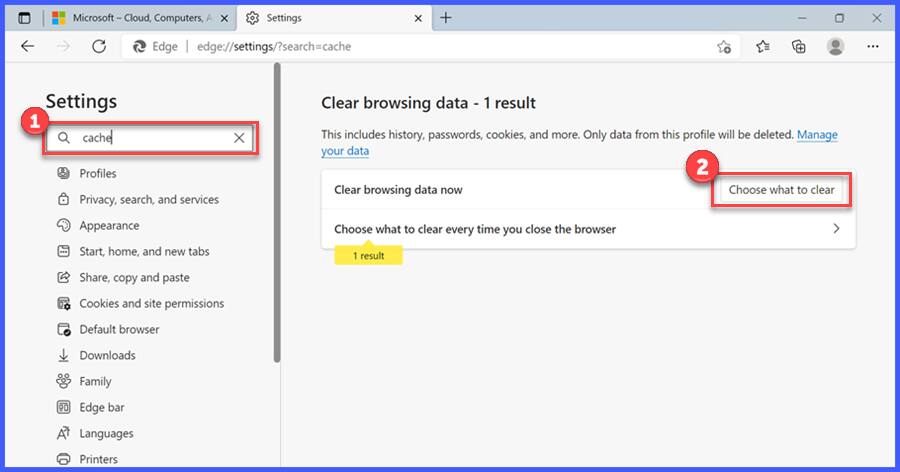
Edge Figure 3
- Click the drop-down next to "Time range" and select "All time" (See Edge Figure 4).
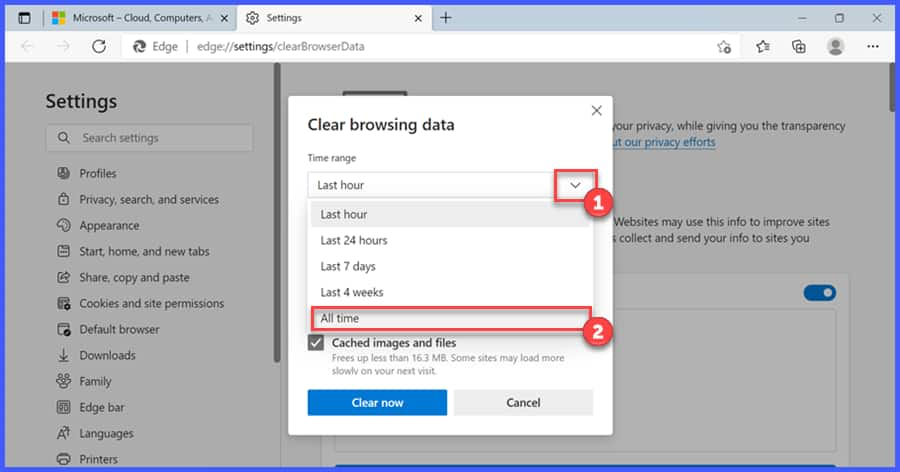
Edge Figure 4
- Click "Clear now" (See Edge Figure 5).
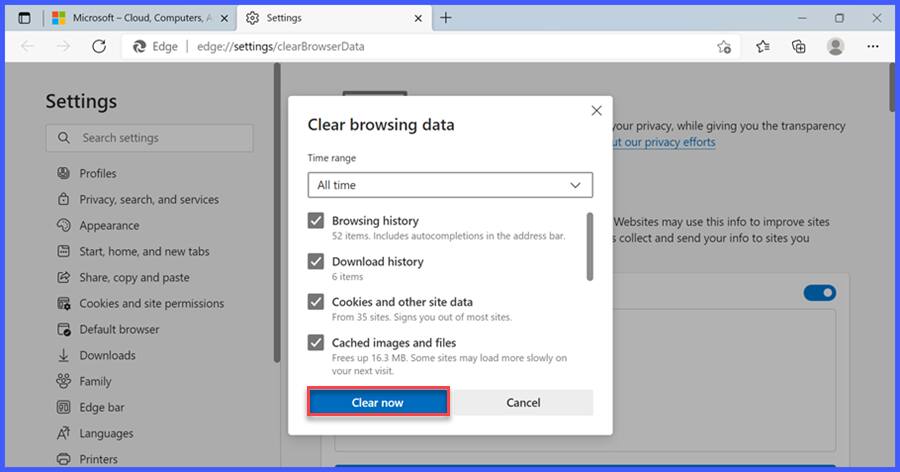
Edge Figure 5
Enable/Disable the Automated Process
To enable "Clear browsing data on close", follow these steps:
- Click the "..." menu icon (See Edge Auto Clear Figure 1).
Edge Auto Clear Figure 1
- Click "Settings" (See Edge Auto Clear Figure 2).
Edge Auto Clear Figure 2
- Select "Search Settings", then type "cache" and click "Choose what to clear every time you close the browser" (See Edge Auto Clear Figure 3).
Edge Auto Clear Figure 3
- Toggle on the data that will be deleted upon exit (See Edge Auto Clear Figure 4).
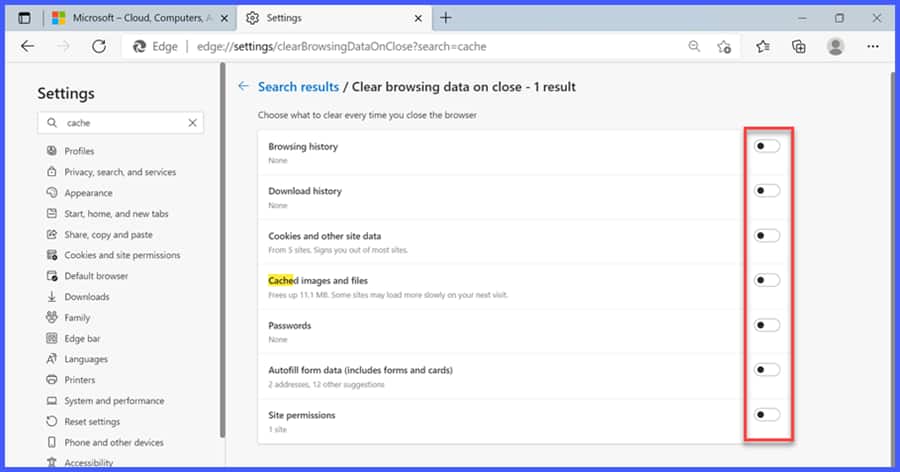
Edge Auto Clear Figure 4
- Browsing history: Clears the list of visited sites stored in this browser.
- Download history: Clears the list of files downloaded from this browser.
It does not delete the files themselves, just the list in the browser. - Cookies and other site data: Clears the website-specific cached files stored in this browser.
- Cache images and files: Clears the general online image cache stored in this browser.
- Passwords: Clears the passwords stored only in this browser.
- Autofill form data: Clears the cache of forms and credit card data stored in this browser.
- Site permissions: Resets the site-specific permissions stored in this browser.

Version 78 (Pre-New Edge Versions)
- Click the "..." menu icon.
- Click "Settings".
- Click the "Lock" icon or "Privacy & Security" (See Edge Legacy Figure 1).
Depending on the version of Edge installed, it may display as just the lock icon or the lock icon with Privacy & Security.
 or
or 
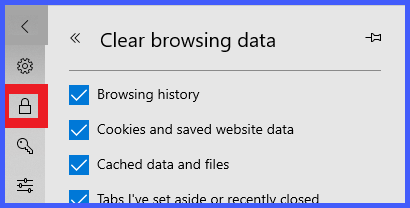
Edge Legacy Figure 1 - Select "Clear Browsing Data" in the right pane.
- Click "Choose what to clear" (See Edge Legacy Figure 2).
Edge Legacy Figure 2
- Select the data to be cleared and click the "Clear" button (See Edge Legacy Figure 3).
Edge Legacy Figure 3
- Close and relaunch Edge.
If a message comes up stating "Some items could not be cleared", reboot the computer and perform steps 1-7 from this section again.
Previous Versions (Early Windows 10)
- Click the "..." menu icon.
- Click "Settings".
- Select "Clear Browsing Data" in the right pane.
- Click "Choose what to clear" (See Edge Legacy Figure 2).
Edge Legacy Figure 2
- Select the data to be cleared and click the "Clear" button (See Edge Legacy Figure 3).
Edge Legacy Figure 3
- Close and relaunch Edge.
If a message comes up stating "Some items could not be cleared", reboot the computer and perform steps 1-6 from this section again.
Enable/Disable the Automated Process
To enable "Clear browsing data on close", follow this steps:
- Click the "..." menu icon.
- Click "Settings".
- Click the "Lock" icon or "Privacy & Security" (See Edge Legacy Auto Clear Figure 1).
Depending on the version of Edge installed, it may display as just the lock icon or the lock icon with Privacy & Security. or
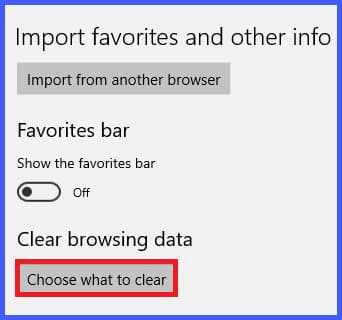
Edge Legacy Auto Clear Figure 1 - Select "Clear Browsing Data" in the right pane.
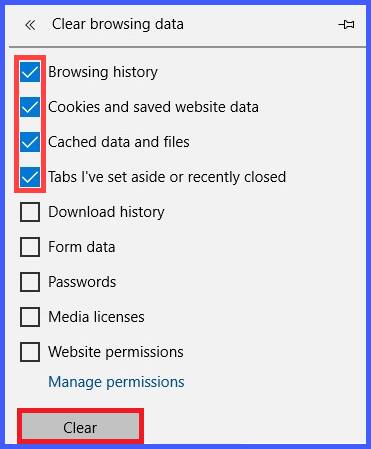
- Click "Choose what to clear" (See Edge Legacy Auto Clear Figure 2).
Edge Legacy Auto Clear Figure 2
- Locate the "Always clear this when I close the browser" section.
- Toggle the slider on/off based on the desired setting (See Edge Legacy Auto Clear Figure 3).
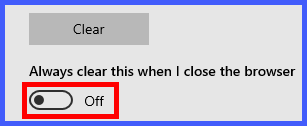
Edge Legacy Auto Clear Figure 3

- Click the "
 " settings icon and select "Internet options" (See IE Figure 1).
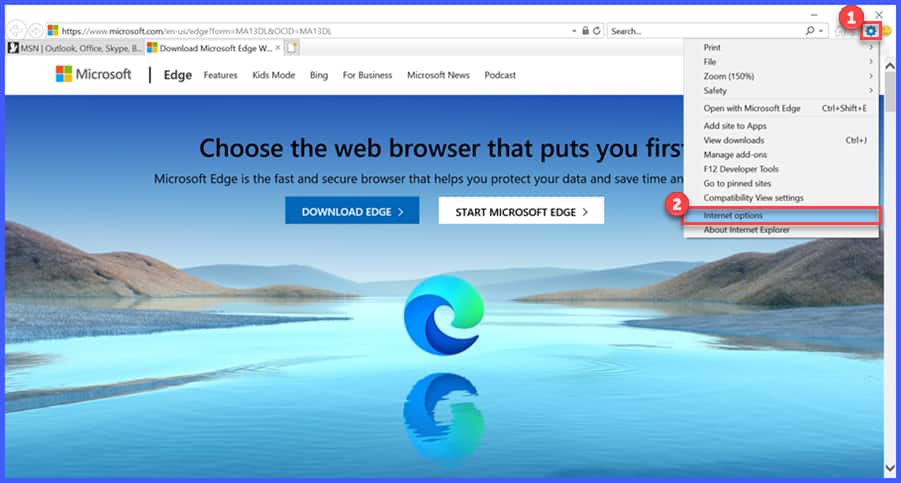
IE Figure 1
- Click "Delete" in the "Browsing history" section (See IE Figure 2).
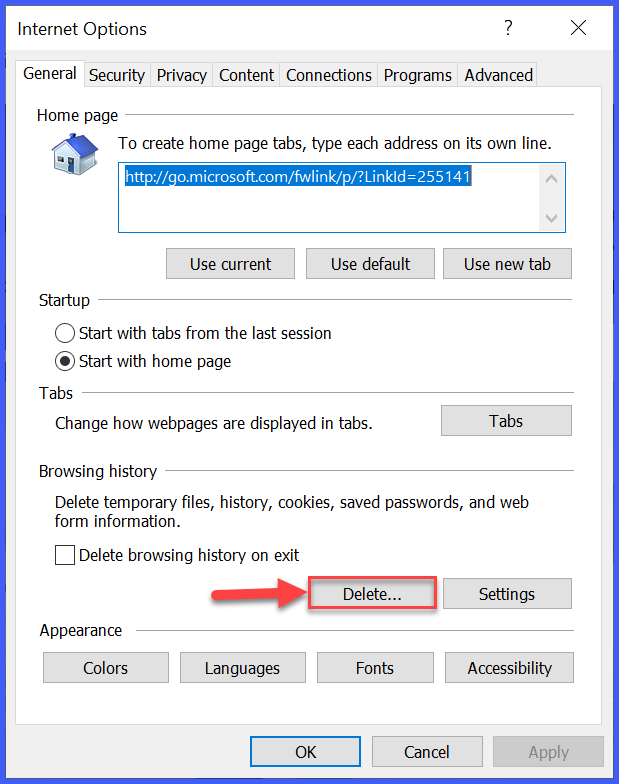
IE Figure 2
- Select the data to be deleted and click "Delete" (See IE Figure 3).

IE Figure 3
- Click "OK" to close "Internet Options" (See IE Figure 4).
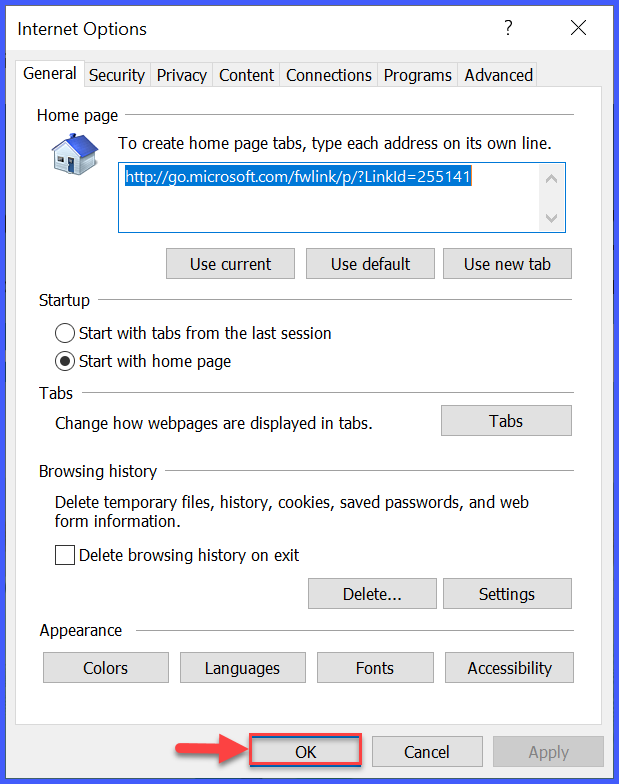
IE Figure 4
- Close and relaunch Internet Explorer.
Enable/Disable the Automated Process
To enable "Clear browsing data on close", follow these steps:
- Click the "" settings icon and select "Internet options" (See IE Auto Clear Figure 1).
IE Auto Clear Figure 1
- Check "Delete browsing history on exit" and click "Ok" (See IE Auto Clear Figure 2).
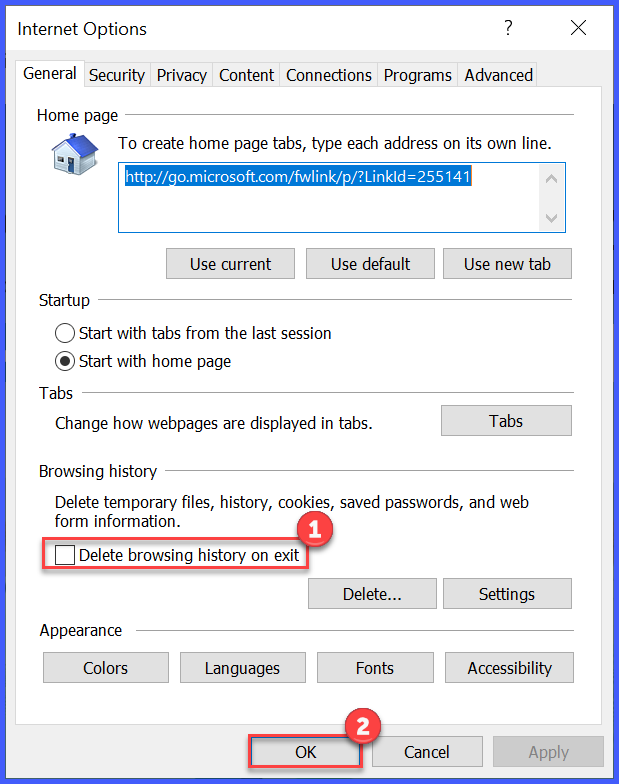
IE Auto Clear Figure 2

- Click the "☰" menu icon and select "Settings" (See Firefox Figure 1).
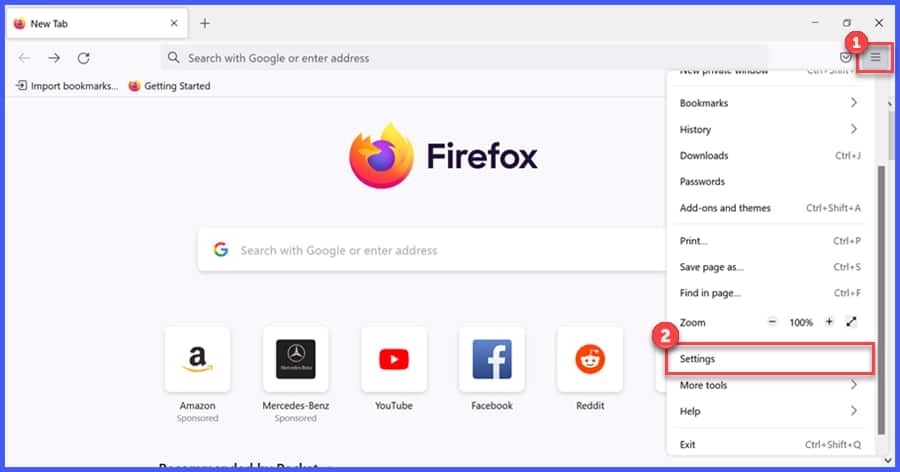
Firefox Figure 1
- Click "Privacy & Security".
- Scroll down to "Cookies and Site Data" and click "Clear Data" (See Firefox Figure 2).
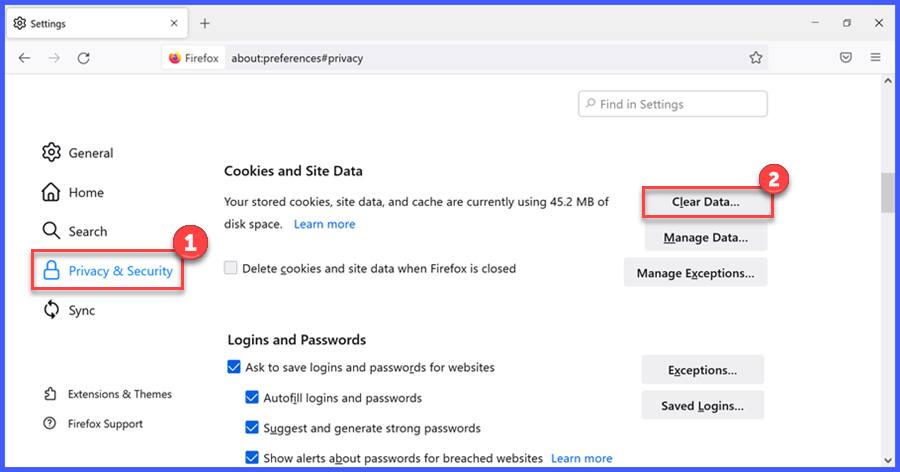
Firefox Figure 2
- Select the data to be cleared and click "Clear" (See Firefox Figure 3).
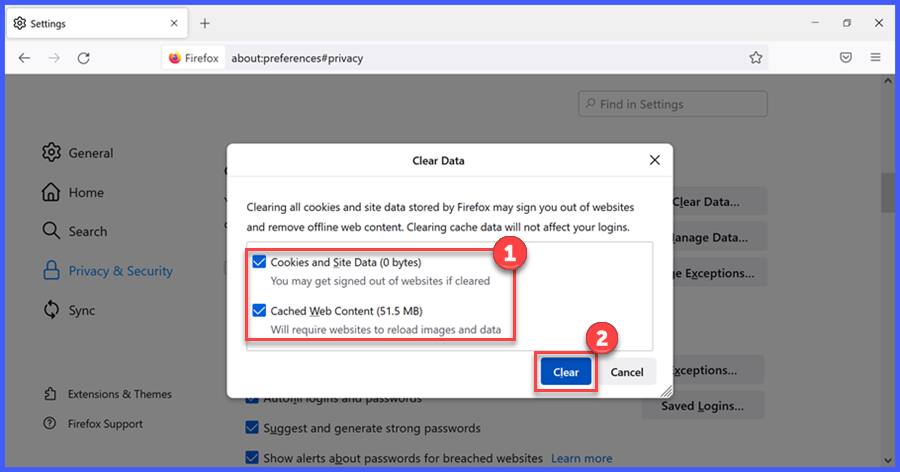
Firefox Figure 3
- Click "Clear Now" from the pop up window (See Firefox Figure 4).
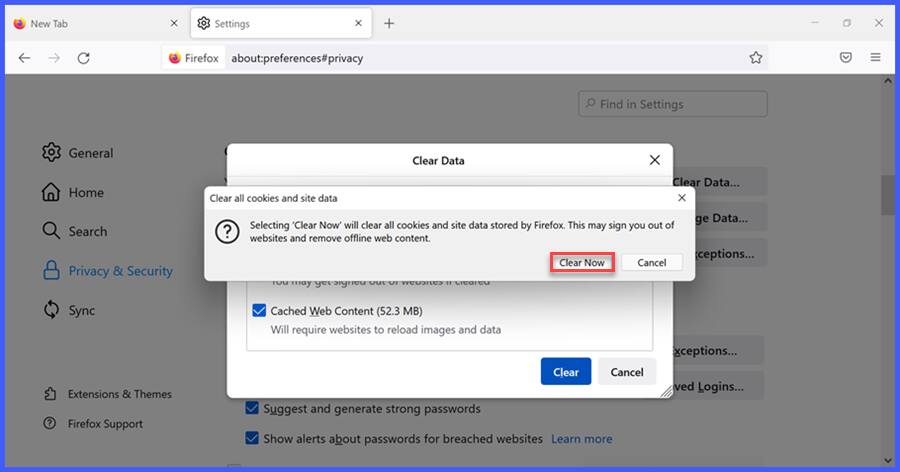
Firefox Figure 4
- Scroll down to "History" and click "Clear History" (See Firefox Figure 5).
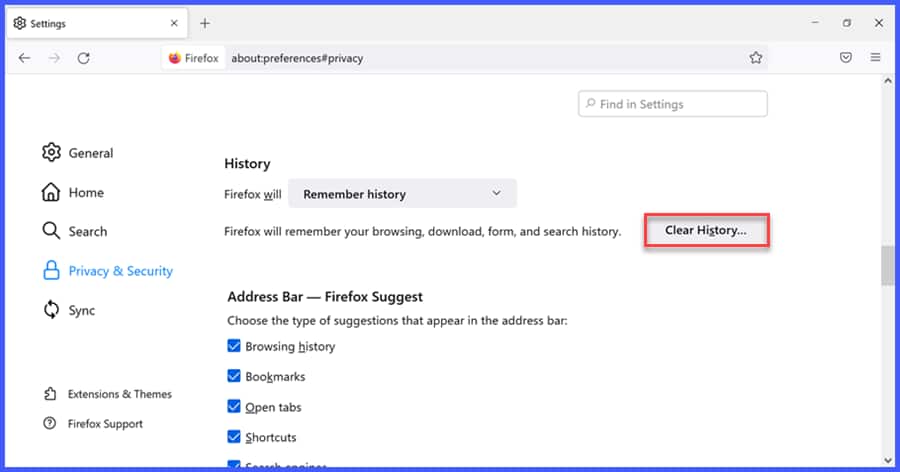
Firefox Figure 5
- Click the drop-down next to "Time range to clear" and select "Everything" (See Firefox Figure 6).
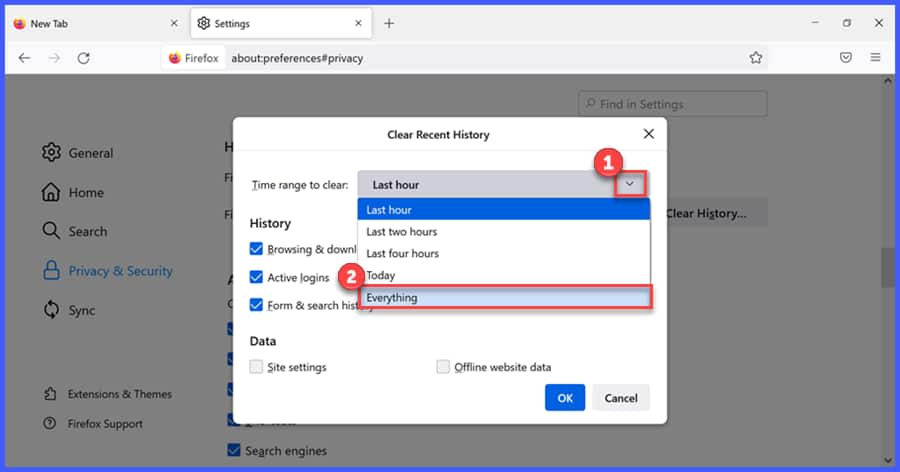
Firefox Figure 6
- Select the data to be cleared and click "Ok" (See Firefox Figure 7).
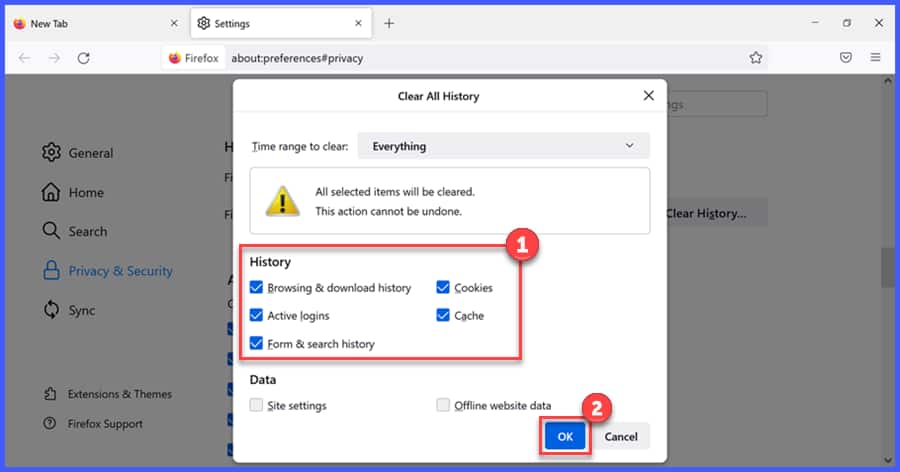
Firefox Figure 7

- Click "History" and select "Clear History" (See Safari Figure 1).
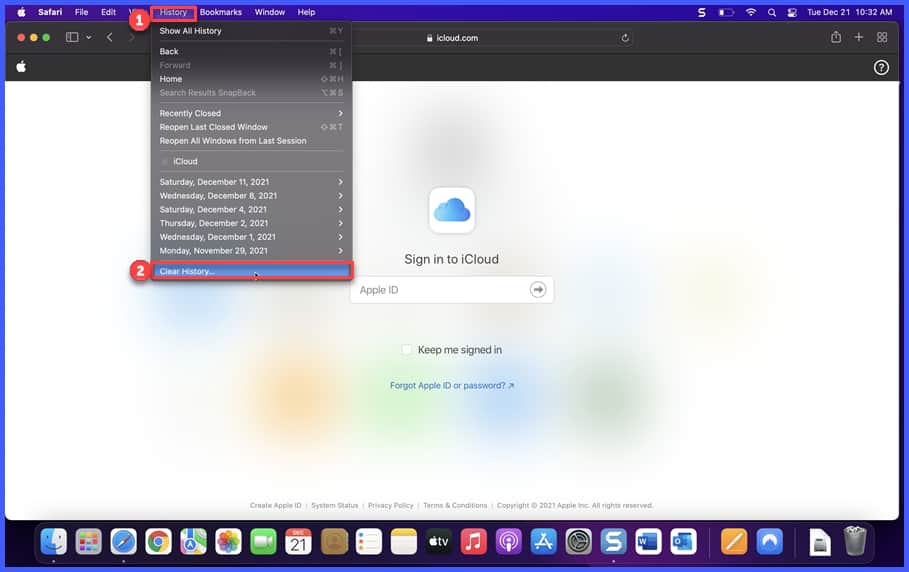
Safari Figure 1
- Click the drop-down next to "Clear" (See Safari Figure 2).
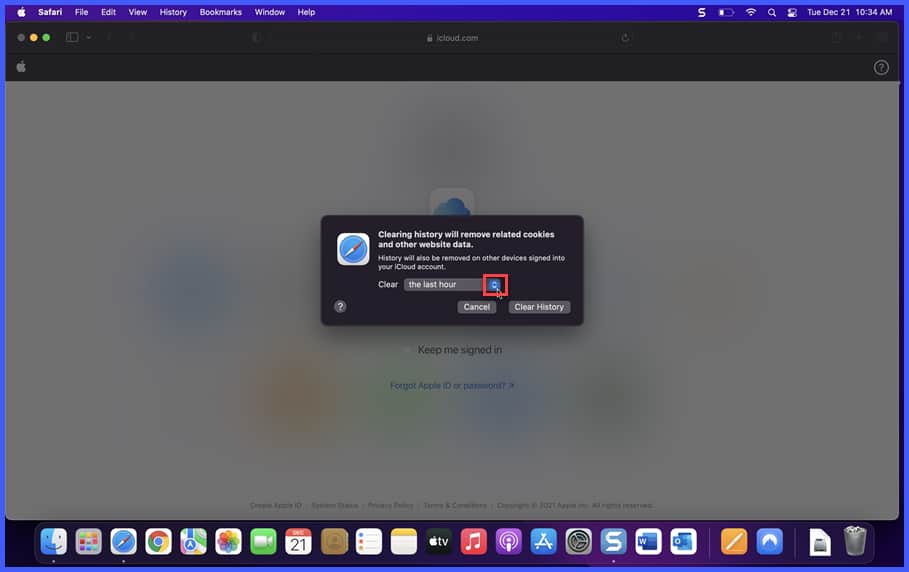
Safari Figure 2
- Select "all history" from the list (See Safari Figure 3).
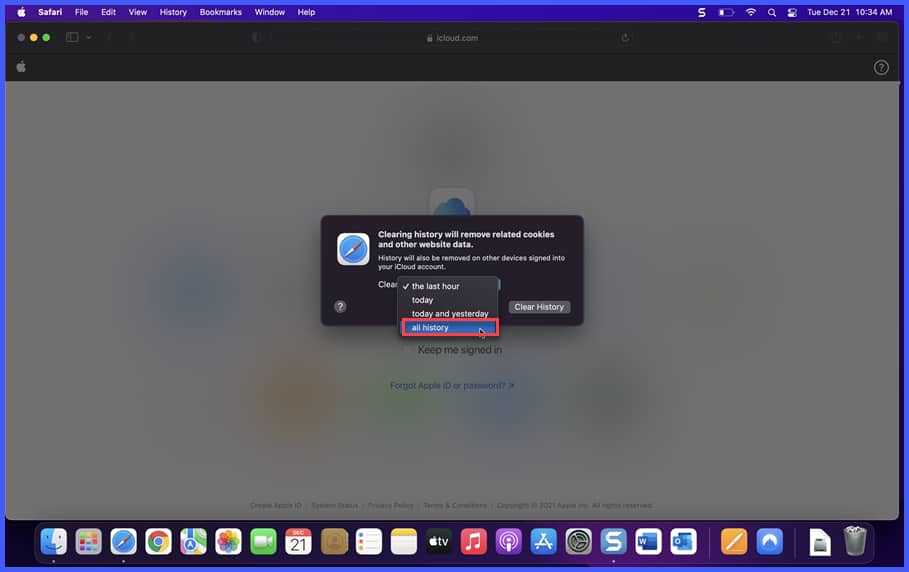
Safari Figure 3
- Click "Clear History" (See Safari Figure 4).
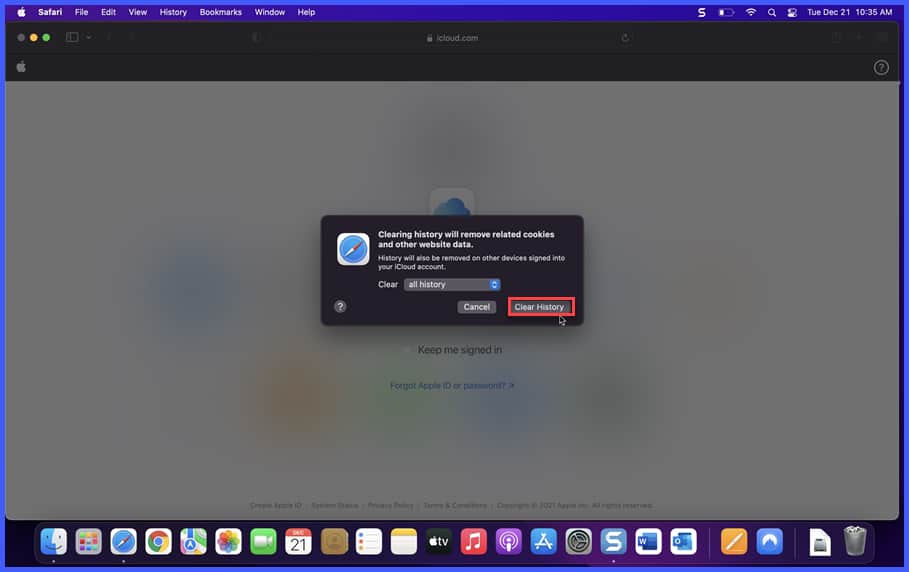
Safari Figure 4
Keywords: Edge, Explorer, Safari, Chrome, Apple, Mac, Browsers, Internet, Temp, Temporary