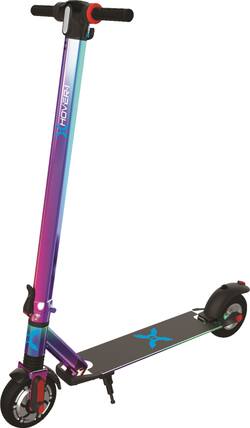
The Hover-1 Aviator is a foldable electric scooter that comes in 3 different color schemes – mine is the Iridescent. The scooter comes in the box mostly assembled – loose items are the handlebars, an allen wrench for adjustments, and the charger. The specs on the scooter are a 15mph top speed with a max 7 miles of range. There is a supported weight range of 44-264lbs. The scooter uses a 320W brushless motor, and weighs 21lbs. The wheels on the scooter are non-pneumatic rubber tires that are puncture proof but provide a harsher ride over bumps.
My first impression pulling the scooter out of the box was it felt heavy – in a good way. It didn’t feel light and cheap like my kids’ Razer scooters. My next thought was being surprised at how cool the paint job looked. The pictures on the listing don’t do the paint job any justice – it’s a real head turner. It reminds me of the pearlescent paint jobs I used to put on my cars in the original Need For Speed Underground (2003 PS2 – 18yrs ago ugghh). Once pulled out of the box I had to install the handlebars – there is a left and right version with opposite threading from each other. The front of the handlebar post has an LED front light for any low light riding. Next to the right handle is the throttle (black thumb lever). Next to the left handle is the electric brake (red thumb lever). The rear wheel has a fender cover with an integrated brake light. The light flashes while braking, and at night when the headlight is activated the light is steadily lit while riding. The fender doubles as the manual brake – exactly like the brake on a Razer scooter. Instructions said to charge it to full before first use, so I tossed it on the charger.
In between the handlebars is the display and power button. Powering on the scooter requires holding the power button for a few seconds. Once it powers up you can see your speed display, your power modes, headlight status, and cruise control engagement. There are 2 power modes – P1 and P2. P1 is lower powered with the top speed limited to around 9mph. P2 allows you to access the max speed of the scooter. When switching power modes you are supposed to bring the scooter to a stop before making the change. The change is made by pressing the power button once while the scooter is already on. Double clicking the power button while the scooter is on activates the headlight. To engage the cruise control is honestly a bit tricky and really poorly explained by the manual. You need to be going at least 3mph or more before engaging it. You do so by getting up to the speed you want, very quickly releasing the throttle, and then double tapping the throttle all/part of the way down to engage the cruise control. It takes some practice to get it right, but it’s a nice feature if you are going on a long cruise.
The charger plugs into a port with a rubber cap near the top of the handlebar post. There is a small light on the charger – it is red when charging and changes to green once the battery is topped off. Charging from a fully drained battery only seemed to take about 4-5 hours.
Before riding you have to unfold and lock in the handlebar tower. This is pretty easy, albeit confusing the first time. You have to fully stand the tower up into the riding position. Then you have to flip the little latch up and snap it into the notch. It should make a good click noise once the latch is engaged. The fold back up you have to rotate the little blue safety catch on the latch before popping it free. When folding down you hook the top of the handlebar into the rear wheel fender – you have to press the fender down for the hook on the handlebar to slip into the pocket on the fender. Once it slides into the pocket you can release the fender and pickup the scooter.
Riding the Aviator comes with several restrictions that you need to be aware of. The manual outlines these pretty well. Riding the scooter should be carried out on smooth dry surfaces (no wet streets or rain rides), avoid bumps/curbs/cracks that are taller then ½”, temperature extremes (below 32° and about 104°), and low light/visibility conditions. The manual also states to avoid sand, gravel, mud, debris (sticks), or other rugged terrain. Most of these are pretty easy to follow, but finding smooth pavement that completely free of cracks, bumps, debris, gravel, and hills is easier said than done.
The experience and performance of the scooter is directly related to the weight of the rider and the terrain you ride on. I wanted to get a range of data on the Aviator in terms of rider experience. I had myself (190lbs), GF (130lbs), and her teenagers (170lbs and 100lbs) all take turns and go for rides. Me being the heaviest went the slowest. On a freshly charged battery the first few minutes of the ride I could hit a max of 13mph on a flat surface, and 15mph on a slight decline. A slight incline would drop me to 11 or 12. After about 3-4 minutes of riding my max speed settled back to 12mph on flat, and an incline knocked me down to 9 or 10. I call this early part of the battery charge the boost period. The other riders faired better. My GF could hit 15 on a flat with a fresh battery before settling back to 13 after 5-6 minutes. Inclines were at 11 for her. Declines she could hit 14-15 without much hassle. The heavier teen was closer to my results with just a little longer boost period. Their result on inclines was slightly better as well. The lightest teen had it the best. Boost time lasted the longest (6-7 minutes). They could hit the top speed of 15 for much longer and the slight incline would just barely knock them down (13-14). You do deal with battery fade towards the end of the charge – it’s the opposite of the boost period. The last 15-20% of the battery you are going slower and having a harder time with inclines. On flat ground this isn’t as much of an issue because I could still hit 10mph, but it was noticeably fading. Its time to charge at this point.
The Aviator struggles with hills. If you are trying to go up a steep hill you are absolutely going to chew through more battery life, and you are going to slow way down. The Aviator doesn’t have a lot of torque that can handle this situation. For me if my speed dropped below 7mph then I would consider pushing if I still had a lot of hill to go up. In most of these cases I treated the electric motor as a hill climb assist. I could kick/push along while the motor helps me maintain momentum. I went up several 2-3 block long decent hill climbs like this, and it wasn’t an issue for me.
I avoided most of the riding conditions that the manual tells you to stay away from. Some small gravel, stones, sticks, and bumps just couldn’t be avoided. I did my best to avoid any big bumps though, and I doubt I attempted to cross over anything more than ¾”. Any big bumps I slowed way down for or avoided all together – the ones I didn’t avoid were ones I didn’t see coming. I did do some night time rides around my neighborhood. I only did this because there is very little traffic and I know the street well enough to be able to avoid bumps/cracks/gravel. I rode with the headlight only the first time, but I found it to be a little lacking for my taste. The light does a nice job of lighting up 15ft ahead of you, but I wanted a little more range so I wore a camping headlamp as well. This combo worked out and I felt pretty comfortable riding at night. The reflector stickers on the scooter work alright, but you really need to have something reflective on if you want to take this out in the dark.
Most of my trips were short runs from my house to my GF’s which is just a 6 block trip. The scooter was great for this, but it didn’t give me any insight to the overall range. I took the Aviator for a long ride – 4.5miles round trip to a gas station that included several hills to see what its max range would be for me on it. I set off with a freshly charged battery, and I zipped through my neighborhood streets. I rode down the sidewalk for most of the trip. I had to be careful here because several areas of the sidewalk had some upheaval due to tree roots causing taller bumps I had to avoid. I made the trip without any issue – I did have to kick up the hills since they were long and steep. I was left with about 30%+ of my battery.
A couple of things to note. Using the electric brake is a weird experience because you feel yourself really lurch forward as you apply the brake – much like using the front brakes on your bike but even more pronounced. It also can’t bring you to a complete stop, but it can knock you down to about 2mph before it stops activating. For complete stops use the manual brake. The brakes are also not super effective, so your braking distance from speed is longer than expected unless you use both at the same time. Also, when the battery gets low enough you can no longer apply the throttle, but you can still brake. Another thing to note is if you just want to kick around and not use the motor you can’t turn the scooter off while in motion. You have to come to a complete stop before you can power down the scooter. Lastly the handlebar post is a fixed height. I can’t imagine someone much below 5’ being able to easily or safely ride the scooter.
Riding the scooter around is very enjoyable, and I really didn’t have many complaints. If I was a lighter person I would have even more fun because I could go faster and inclines wouldn’t dig at me as much. The paint job is amazing looking and really is something to stare at – unfortunately it also really shows fingerprints, so you need to wipe it down every so often.