Vantop - Snaptain SP7100S Drone with Remote Controller - Black
- Key Specs
- Control Type: Remote control, App-controlled
- General
- Product Name: Snaptain SP7100S Drone with Remote Controller
- Brand: Vantop
- Assembly Required: No
- Recommended Minimum Age: 14 years
- Model Number: SP7100S
- Color: Black
- Flight
- Autonomous Flight Modes: Return to take-off point, Landing, Waypoint navigation
- Obstacle Avoidance Technology: None
- Number of Rotors: 4
- Camera
- Integrated Camera: true
- First Person View (FPV): true
- Image Sensor Type: CMOS (CCD and CMOS are the two main technologies used in image sensors. CCD, the older of the two types, turns analog light signals into digital pixels. This conversion happens without distortion, resulting in high-quality images. Newer CMOS sensors use transistors at each pixel to move electrical charges. CMOS sensors are typically less expensive, but also require more light to create distortion-free images.)
- Environmental
- Indoor Or Outdoor Use: Outdoor (Indicates the appropriate environment product was designed to be used in.)
- Compatibility
- App Compatible: true (The product can be connected to a program or software application on a mobile device, which then receives collected data from the product.)
- Mobile Device Holder: true
- Mobile Device Holder Maximum Device Width: 3.35 inches
- Operating System Compatibility: Android, Apple iOS
- Features
- Control Type: Remote control, App-controlled
- Integrated GPS: Yes
- Landing Gear/Legs Included: None
- Storage
- Memory Card Compatibility: microSD (The type of memory card(s) recommended for use with the product.)
- Memory Card Included: false (Indicates whether a memory card is included.)
- Power
- Rechargeable Battery: true
- Removable Battery: true
- Charging Time: 300 minutes
- Controller Batteries Included: true
- Controller Battery Size: Other
- Other
- UPC: 810089905116
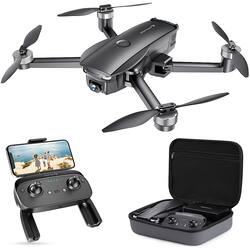
Our most advanced drone, the SP7100S, includes a 4K camera for capturing clear images from various angles. When you lose signal, the battery runs low, or you press the Return to Home button, this drone will automatically return to its starting points.
- 4K UHD camera: The professional 4K UHD camera enables capturing clear images from different angles by adjusting camera lens up and down. Upgraded 5G Wi-Fi transmission guarantees the fluency of real-time images through APP.
- Intelligent return to home: With GPS positioning, the drone will automatically fly back to starting points when you lose signal, battery is low or if you press Return to Home. Even if the GPS signal is weak, the drone will automatically switch to Altitude Mode to keep the drone in your sight.
- More enjoyment: The intelligent SP7100 is equipped with an advanced flight mode, such as points of interest, waypoints, gesture for photos/videos. Plan a flying route as you like or record wonderful moments by giving a gesture. Free your hands and start your adventure whenever and wherever.
- Safe and easy operation: Optical Flow Positioning gives you more precise position and more stable flight even on windy day.Functions like one key start/stop, headless mode, emergency stop, altitude hold, allows beginners to get started quickly.
- Considerate design: Foldable remote and drone makes outdoor flying more convenient. The drone will automatically turn off if no operation within 10 minutes. The control range of 2.4GHz transmitter up to 2600 feet range and the powerful battery works 26 minutes for each charge.
Whats Included
- Snaptain SP7100 GPS Drone
- Remote (built in battery)
- 1 3600mAh Battery
- 4 Spare propellers
- USB Charging Cable (For remote control)
Q: Can you use SD cards with this?
A: Yes
Q: Is the camera mounted on a gimbal?
A: Brand response from Snaptain Team In regard to your query, the camera mounted on the drone, which is a 4K UHD camera. Also, the camera is stable and enables capturing clear images from different angles by adjusting camera lens up and down. We are dedicated to ensuring your 100% satisfaction. If you have any other questions, please reach out to us via [email protected]. We are more than happy to assist you further.
A: Brand response from Snaptain Team In regard to your query, the drone is powered by a rechargeable battery. Therefore, the drone is not waterproof. We suggest that you fly the drone in a no wind or breeze day and open field place where there are no trees/woods around. We are dedicated to ensuring your 100% satisfaction. If you have any other questions, please reach out to us via [email protected]. We are more than happy to assist you further.
Q: can a bait release for fishing be used?
A: Brand response from Snaptain Team For better use and safety in flight, we are sorry that it can't be used a bait release for fishing. We are dedicated to ensuring your 100% satisfaction. If you have any other questions, please reach out to us via [email protected]. We are more than happy to assist you further.
Q: Where an i buy another battery for this drone, and how much is it.. tnx
A: Brand response from Snaptain Team In regard to your query, we are sorry that we don't sell extra battery for SP7100S drone separately. Please do not worry. We guarantee a 1-year manufacturer's warranty on the drone. We are dedicated to ensuring your 100% satisfaction. If you have any other questions, please reach out to us via [email protected]. We are more than happy to assist you further.
Q: What is the range on this drone
A: Brand response from Snaptain Team The range of SP7100 is 500M. We are dedicated to ensuring your 100% satisfaction. Please reach out to us via [email protected]. We are more than happy to assist you further. We offer a 12-month warranty for this product, plus lifetime technical support. Our standard for responding to email quests is less than 24 hours, and we look forward to hearing from you!
Q: what kind of phone is used for this model, to view what the drone will see ?
A: Brand response from Snaptain Team Regarding your issue, the app can work with above Android 4.6 or above IOS 8.0. We are dedicated to ensuring your 100% satisfaction. Please reach out to us via [email protected]. We are more than happy to assist you further. We offer a 12-month warranty for this product, plus lifetime technical support. Our standard for responding to email quests is less than 24 hours, and we look forward to hearing from you!
A: Brand response from Snaptain Team We offer a 12-month warranty for this product, plus lifetime technical support. Our standard for responding to email quests is less than 24 hours, and we look forward to hearing from you!